Please visit my new Web Site https://coderstechzone.com
Most of our project we have to develop a module a upload a file. Its a common scenario for all developers. In classic ASP it was tedious but in ASP.NET we found a nice control to upload/store a file into the web server. The new control in ASP.NET 2.0 is which capable to do everything except few limitations like filtering. So in this article i want to describe how we can upload different type of file as well as effective filtering.
Focaus Area:
1. Save a file into web server hard drive.
2. Giving proper permissions to upload files
3. Apply client side filtering before upload by javascript
4. Apply server side filtering
5. Upload multiple/more than one file at a time
6. Understanding file size limitations
Save a file into web server hard drive:
So start by adding a new page in your project. Add the FileUpload control into your page. Also a add a button to upload the selected file into web server. So the scenario is user have to to select a file first then press a button to save. HTML code will be:
Focaus Area:
1. Save a file into web server hard drive.
2. Giving proper permissions to upload files
5. Upload multiple/more than one file at a time
Save a file into web server hard drive:
So start by adding a new page in your project. Add the FileUpload control into your page. Also a add a button to upload the selected file into web server. So the scenario is user have to to select a file first then press a button to save. HTML code will be:
Just write the below code under cmdUpload button control click event:
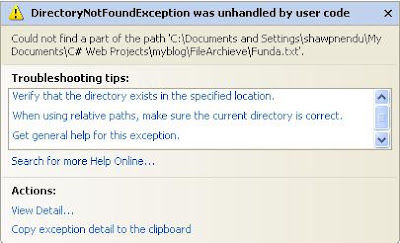
Before running the application you must create a folder in your root directory & named it FileArchieve. Otherwise you will get the bellow DirectoryNotFoundException: Could find a path of the file.... like:
The output interface like:

Click on the browse button to select a file from your local pc then click on the Upload button. Hope now you can upload a file. If cant then check the permission section later in this post.
Giving proper permissions to upload files:
The code works in your development PC but you may receive an error when you publish your site. First check that you created a folder where you want to publish. Secondly check that this folder has enough permission to write a file into this directory.
To do that: First, right-click the folder into which the ASP.NET files should be uploaded. The properties dialog for the selected folder opens. Now click on Security tab to make sure that the ASP.NET Machine Account is included in the list and has the permission to write to disk. Look at the security tab UI:
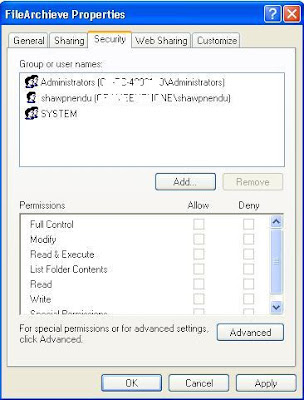
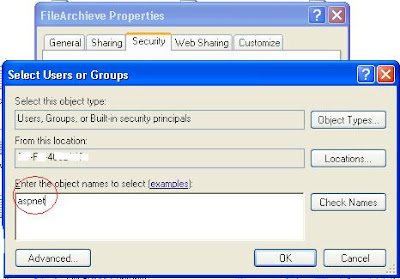
If you look at the image you will see that ASP.NET Machine Account absent here. It will works in your local PC but not in the server. Now i wll let you know how we can add the ASP.NET Machine Account into the list. Click on the Add button under Security Tab. Write aspnet & click OK.
After clicking OK set the write permission to this account. Hope everything will be OK. The final Figure should be:
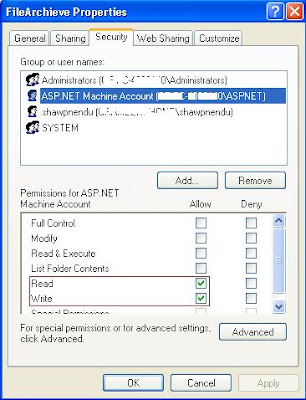
One importatnt thing is if hosting server using Windows Server 2003, then the ASP.Net account name is IIS_WPG. In windows server 2008 it is IIS_IUSRS. So you need to allow appropriate permission (Read/Write) to this user on your server folder to upload the file.
Client side filtering:
If you are familiar with .net desktop application then you may search the functionality like Filter property of OpenFileDialog. For you, the answer is NOP. Asp.net has no functionality like OpenFileDialog. But we can make it using javascript. Check the below script & append it under aspx page head tag:

The output interface like:

Click on the browse button to select a file from your local pc then click on the Upload button. Hope now you can upload a file. If cant then check the permission section later in this post.
Giving proper permissions to upload files:
The code works in your development PC but you may receive an error when you publish your site. First check that you created a folder where you want to publish. Secondly check that this folder has enough permission to write a file into this directory.
To do that: First, right-click the folder into which the ASP.NET files should be uploaded. The properties dialog for the selected folder opens. Now click on Security tab to make sure that the ASP.NET Machine Account is included in the list and has the permission to write to disk. Look at the security tab UI:

If you look at the image you will see that ASP.NET Machine Account absent here. It will works in your local PC but not in the server. Now i wll let you know how we can add the ASP.NET Machine Account into the list. Click on the Add button under Security Tab. Write aspnet & click OK.

After clicking OK set the write permission to this account. Hope everything will be OK. The final Figure should be:

One importatnt thing is if hosting server using Windows Server 2003, then the ASP.Net account name is IIS_WPG. In windows server 2008 it is IIS_IUSRS. So you need to allow appropriate permission (Read/Write) to this user on your server folder to upload the file.
Client side filtering:
If you are familiar with .net desktop application then you may search the functionality like Filter property of OpenFileDialog. For you, the answer is NOP. Asp.net has no functionality like OpenFileDialog. But we can make it using javascript. Check the below script & append it under aspx page head tag:
Now modify your cmdUpload HTML in the following way to invoke the script first:
Script has been tested for the below Browsers:
IE
Mozilla Firefox
Opera
Server side filtering:
Server side filtering is must since readers may off javascript. To apply the server side validation you have to modify the cmdUpload button click event handler with the following code segment:
Server side filtering is must since readers may off javascript. To apply the server side validation you have to modify the cmdUpload button click event handler with the following code segment:
You can also check file exist or not by adding the below condition:
if (!System.IO.File.Exists(Server.MapPath("FileArchieve") + "\\" + FileUpload1.FileName))
Upload multiple file with a single click:
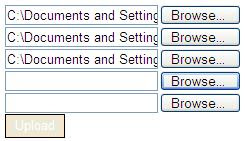
No built-in capabilities in the Microsoft .NET Framework enable you to upload multiple files from a single ASP.NET page. The trick is to import the System.IO class into your ASP.NET page and then to use the HttpFileCollection class to capture all the files that are sent in with the Request object. This approach enables you to upload as many files as you want from a single page. To do this here i have added 5 FileUpload control. Modify the button click event with the following code:
UI looks like:
Understanding file size limitations:
You may encounter an issue when you or your user wants to upload more than 4MB size file because the maximum size that can be uploaded to the server is around 4MB or 4096kb, i.e., the size of the file to be uploaded should be less than 4MB. To resolve this issue you have to make some changes in the web.config file; e.g., if you want to upload around 10MB, then make the following change in thenode of the system.web section of the web.config file.

Understanding file size limitations:
You may encounter an issue when you or your user wants to upload more than 4MB size file because the maximum size that can be uploaded to the server is around 4MB or 4096kb, i.e., the size of the file to be uploaded should be less than 4MB. To resolve this issue you have to make some changes in the web.config file; e.g., if you want to upload around 10MB, then make the following change in the
You can do a lot with the httpRuntime section like idleTime, minFreeThreads, appRequestQueueLilit. But the above two properties were more important. Here i stated 11000 as the value of maxRequestLength since its in kb & executionTimeout value is in second.
Ref:
http://msdn.microsoft.com/en-us/library/aa479405.aspx
Ref:
http://msdn.microsoft.com/en-us/library/aa479405.aspx


3 comments:
that's very good, but what will you do if somebody uploads to you non-jpg,gif file(maybe javascript file) with jpg,gif extension
Great Post....Good information regarding the size limitation in the web config file.
how to upload multiple file by creating dynamic fileupload control when click on a button control like as Gmail service of multiple file uploading on click more button
I WOULD BE DELIGHTED TO HEAR FROM YOU