Tuesday, March 10, 2009

Export GridView data to Excel,Word, & Text file


Please visit my new Web Site WWW.Codedisplay.com


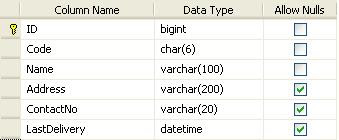
Exporting GridView data to Excel,Word, & Text file is a very common task which is performed in most of the asp.net web applications to meet the customized reporting purposes. There are various techniques of exporting the GridView to excel and it highly depends on the application scenario. I will show you that how you can export your GridView data to Excel file, Word file and also Text file. When exporting keep the format of data is a very frequent requirement and also user might want to set different format which i will discuss in the later section of this post. So lets start with direct export to excel. Atfirst we need to create a table in sql server database. Table looks like:


Now we need to add a page. Add a GridView, Button in our page to export data. Now page design is completed. So now we need to bind data to the GridView first. Write the below code under Page_Load event to read data from sql server table:

SqlConnection myConnection = new SqlConnection("Data Source=.\\SQLEXPRESS;Initial Catalog=TESTDB;Trusted_Connection=yes;");
SqlDataAdapter Sqlad = new SqlDataAdapter("SELECT * FROM tblSupplier", myConnection);
DataSet dsSupplier = new DataSet();
Sqlad.Fill(dsSupplier);
gvEdit.DataSource = dsSupplier;
gvEdit.DataBind();


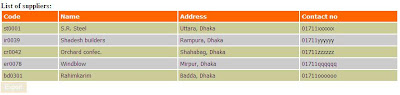
Now run the page hope you will see the below image keep in mind that we don't implement export functionality yet:


OK now the display part of this example is completed. Now try to export data in different file types.

Export to Excel:
To do that write the below code under export button click event:

Response.Clear();
Response.AddHeader("content-disposition", "attachment; filename=SupplierList.xls");
Response.ContentType =
"application/vnd.xls";
System.IO.
StringWriter WriteItem = new System.IO.StringWriter();
System.Web.UI.
HtmlTextWriter htmlText = new HtmlTextWriter(WriteItem);
gvEdit.RenderControl(htmlText);
Response.Write(WriteItem.ToString());
Response.End();


Ouput sample:


Don't forget to override the VerifyRenderingInServerForm method. For exporting each page must have override this method:

public override void VerifyRenderingInServerForm(Control control) { }


Export to Excel when GridView has paging:
Its a little bit tricky to export data when GridView has Paging functionality. Just set the AllowPaging property to False beforeexporting data. Now export button click event code like:

Response.Clear();
Response.AddHeader("content-disposition", "attachment; filename=SupplierList.xls");
Response.ContentType = "application/vnd.xls";
System.IO.StringWriter WriteItem = new System.IO.StringWriter();
System.Web.UI.HtmlTextWriter htmlText = new HtmlTextWriter(WriteItem);
gvEdit.AllowPaging = false;
DataTable dtSupplier = (DataTable)ViewState["dtSupplier"];
gvEdit.DataSource = dtSupplier;
gvEdit.DataBind();
gvEdit.RenderControl(htmlText);
Response.Write(WriteItem.ToString());
Response.End();


Export to Excel when GridView contains control:
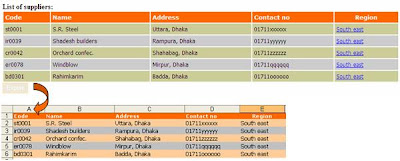
Replace corresponding GridView cells by controls value. Let you have a supplier list & you wantto display each supplier location as well as you want a facility that when user open thelist then user can see the regions other suppliers in a popup. To do that you have to add a link button in your GridView so that user can click on the link to view the other suppliers. Alsoyou have to export region value to Excel file. So how you can handle. Answer is replace the cell valueby link text just before exporting. Code sample:

//Read each GridView Row Data by itearation & replace
foreach (GridViewRow oItem in gvEdit.Rows)
{
LinkButton lnk=((LinkButton)oItem.FindControl("lnk"));
oItem.Cells[4].Text=lnk.Text;
lnk.Visible = false;
// Remove other controls like radio,dropdown or html controls also in the above way
}
Response.Clear();
Response.AddHeader("content-disposition", "attachment; filename=SupplierList.xls");
Response.ContentType = "application/vnd.xls";
System.IO.StringWriter WriteItem = new System.IO.StringWriter();
System.Web.UI.HtmlTextWriter htmlText = new HtmlTextWriter(WriteItem);
gvEdit.RenderControl(htmlText);
Response.Write(WriteItem.ToString());
Response.End();


Output sample:


Export to Word:
To export GridView data to ms-word just modify your button click event by the following code sample:

Response.Clear();
Response.AddHeader("content-disposition", "attachment; filename=SupplierList.doc");
Response.ContentType = "application/vnd.word";
System.IO.StringWriter WriteItem = new System.IO.StringWriter();
System.Web.UI.HtmlTextWriter htmlText = new HtmlTextWriter(WriteItem);
gvEdit.RenderControl(htmlText);
Response.Write(WriteItem.ToString());
Response.End();


Export to Text:
To export GridView data to a text file just modify your button click event by the following code sample:

//Always use StringBuilder for string operations it will enhance the performence
System.Text.StringBuilder str = new System.Text.StringBuilder();
foreach (GridViewRow oItem in gvEdit.Rows)
{
for (int j = 0; j <= oItem.Cells.Count- 1; j++)
str.Append(oItem.Cells[j].Text+" ");
str.Append("\r\n");
}
Response.Clear();
Response.AddHeader("content-disposition", "attachment;filename=SupplierList.txt");
Response.ContentType = "application/vnd.text";
Response.Write(str.ToString());
Response.End();


Export to Excel with proper fomatting:
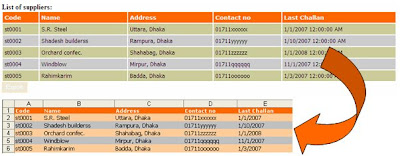
Hope from above example now one can easily export data from GridView. But an important concern is to setthe formatting to the target file. In this reagard mso-number-format ease our life. Lets we need todisplay date & time in the GridView but we wants short date format when exporting. To do the one can use mso-number-format in the following way. Modify your export button click event by the following code segment.

string datestyle = @"<style>.date { mso-number-format:'Short Date'; }</style>";
foreach(GridViewRow oItem in gvEdit.Rows)
oItem.Cells[4].Attributes.Add("class","date");
Response.Clear();
Response.AddHeader("content-disposition", "attachment; filename=SupplierList.xls");
Response.ContentType = "application/vnd.xls";
System.IO.StringWriter WriteItem = new System.IO.StringWriter();
System.Web.UI.HtmlTextWriter htmlText = new HtmlTextWriter(WriteItem);
Response.Write(datestyle);
gvEdit.RenderControl(htmlText);
Response.Write(WriteItem.ToString());
Response.End();


Output sample:


List of some useful mso-number-format:
FormatDescription
mso-number-format:"0"NO Decimals
mso-number-format:"0\.000"3 Decimals
mso-number-format:"\#\,\#\#0\.000Comma with 3 dec
mso-number-format:"mm\/dd\/yy"Date7
mso-number-format:"mmmm\ d\,\ yyyy"Date9
mso-number-format:"m\/d\/yy\ h\:mm\ AM\/PM"Date -Time AMPM
mso-number-format:"Short Date"04/07/2008
mso-number-format:"Medium Date"04-Jun-08
mso-number-format:"d\-mmm\-yyyy"04-Jun-2008
mso-number-format:"Short Time"4:49
mso-number-format:"Medium Time"4:49 am
mso-number-format:"Long Time"4:49:13:00
mso-number-format:"Percent"Percent with two dec.
mso-number-format:"0%"Percent with no dec.
mso-number-format:"0\.E+00"Scientific Notation
mso-number-format:"\@"Text
mso-number-format:"\#\ ???/???"Fractions up to 3 digits
mso-number-format:"\0022£\0022\#\,\#\#0\.00"£10.52
mso-number-format:"0\.0000";font-weight:700;4 dec.+multiple format

Note:
If you do not find your required format from above list then try creating a spreadsheet with a single cell entry according to your required format. Then from file menu select the 'Save as Web Page' option to create a html file. Read & examine the code for this and findout the mso-number-format from the style declarations.
***Click for more details on GridView Column Formatting in my another article

Sunday, March 8, 2009

Codeless sorting/paging GridView in asp.net


Please visit my new Web Site WWW.Codedisplay.com


Atfirst this post is only for beginner. Here i am introducing the most popular control in asp.net is GridView. A tremendous improvement over asp. Do you think that without writng a single line of code you can present a page with sorting & paging facility? Yes you can do it with few clicks just follow my below steps:

1) Modify your web.config file to write the connectionstring. Code should be:

<connectionStrings>
<
add name="TestConnection" connectionString="Data Source=.\SQLEXPRESS;Initial Catalog=TESTDB;Trusted_Connection=yes;" providerName="System.Data.SqlClient"/>
</
connectionStrings>


2) Add a SqlDataSource in your page & set the properties described in the following image to read data from your database.


3) Now add a GridView control & set the DataSource property to the SqlDataSource. Alos check the Enable paging, Enable sorting CheckBox. Now your page looks like below.


Now run your page & click on the header for sorting & click on the page number for paging. You can set the PageSize properties of GridView that how many rows you want to display in one page. In the following image my PageSize is 3.


Read the below link for simple almost codeless Insert, Delete & Update operation on GridView control: http://shawpnendu.blogspot.com/2009/03/simple-quick-way-to-insertdeleteupdate.html

Friday, March 6, 2009

A simple & quick way to Insert/Delete/Update data in GridView using SqlDataSource


Please visit my new Web Site WWW.Codedisplay.com


For each & every database driven web application development based on asp.net, no one can avoid the asp.net powerful control GridView because of its set of builtin capabilities & a long list of extensions & improvements. The GridView control provides us the infrastructure for in-place Editing & Deleting. But for Insertion its left for developers(strange). Here i am showing how you can Insert/Update/Delete data using GridView with minimum coding. You can implement Update/Delete without writing a single line of code thats why at first i am showing Update & delete operations & in the later section i will describe how to Insert.

Atfirst we need to create a table in SQL Server database. For this example i use the below table named tblSupplier:


Now open a new asp.net application. To connect to the database we need to make a connectionstring first. So open the web.config file and add your connectionstring. The connectionstring looks like:

<connectionStrings>
<
add name="TestConnection"connectionString="Data Source=.\SQLEXPRESS;Initial Catalog=TESTDB;Trusted_Connection=yes;"
providerName
="System.Data.SqlClient"/>
</
connectionStrings>


Now open your page & add a SqlDataSource control. Now click right mouse button on the control. Goto Configure Data Source. Now in the popup dropdownmenu you will see your connectionstring:


Now click on next. From next select the tablename plus columns. Then click on advance and check Generate Insert, Update, and Delete statements checkbox. For this example this should be:


Ok now our page is ready to transfer data with database. To display data now add a GridView control in your page. Set the Data Souurce plus check Enable Editing & Enable Deleting like:


Now the code of the GridView looks like below:

<asp:GridView ID="GridView1" runat="server" Width="500px" AutoGenerateColumns="False" DataKeyNames="ID" DataSourceID="dsSupplier" AutoGenerateDeleteButton="True" AutoGenerateEditButton="True">
<Columns>
<asp:BoundField DataField="Code" HeaderText="Code" />
<asp:BoundField DataField="Name" HeaderText="Name" />
<asp:BoundField DataField="Address" HeaderText="Address" />
<asp:BoundField DataField="ContactNo" HeaderText="ContactNo" />
</Columns>
</
asp:GridView>


You can change the order of the column by rearranging the BoundField from page source code. Now our page is ready to run. Run the page. Now you can Edit & Delete the data from GridView. Since we don't implement Insert operation yet so insert few data into the Database table then run the application otherwise you can't do the edit/delete operation. The page now looks like:


Now you can Edit & Delete data from your page which rquires just few clicks.


Now Inserting. It requires few tricks to implement. First we need to modify our GridView code like:

<asp:GridView ID="GridView1" runat="server" AutoGenerateColumns="False" DataKeyNames="ID"
DataSourceID="dsSupplier" OnRowCommand="GridView1_RowCommand" ShowFooter="True">
<
Columns>
<
asp:TemplateField HeaderText="Code">
<
ItemTemplate><%# Eval("Code") %></ItemTemplate>
<
EditItemTemplate>
<
asp:TextBox runat="server" ID="Code" Text='<%# Bind("Code")%>' />
</
EditItemTemplate>
<
FooterTemplate>
<
asp:TextBox runat="server" ID="txtCode" Text='' />
</
FooterTemplate>
</
asp:TemplateField>

<
asp:TemplateField HeaderText="Name">
<
ItemTemplate><%# Eval("Name") %></ItemTemplate>
<
EditItemTemplate>
<
asp:TextBox runat="server" ID="EditName" Text='<%# Bind("Name")%>' />
</
EditItemTemplate>
<
FooterTemplate>
<
asp:TextBox runat="server" ID="txtName" Text='' />
</
FooterTemplate>
</
asp:TemplateField>

<
asp:TemplateField HeaderText="Address">
<
ItemTemplate><%# Eval("Address") %></ItemTemplate>
<
EditItemTemplate>
<
asp:TextBox runat="server" ID="EditAddress" Text='<%# Bind("Address")%>' />
</
EditItemTemplate>
<
FooterTemplate>
<
asp:TextBox runat="server" ID="txtAddress" Text='' />
</
FooterTemplate>
</
asp:TemplateField>

<
asp:TemplateField HeaderText="Contact No">
<
ItemTemplate><%# Eval("ContactNo") %></ItemTemplate>
<
EditItemTemplate>
<
asp:TextBox runat="server" ID="EditContactNo" Text='<%# Bind("ContactNo")%>' />
</
EditItemTemplate>
<
FooterTemplate>
<
asp:TextBox runat="server" ID="txtContactNo" Text='' />
</
FooterTemplate>
</
asp:TemplateField>

<
asp:TemplateField HeaderText="Action">
<
ItemTemplate>
<
asp:Button runat="server" ID="cmdEdit" Text="Edit" CommandName="Edit" />
<
asp:Button runat="server" ID="cmdDelete" OnClientClick="return confirm('Are you sure to delete')" Text="Delete" CommandName="Delete" />
</
ItemTemplate>
<
EditItemTemplate>
<
asp:Button runat="server" ID="cmdUpdate" Text="Update" CommandName="Update" />
<
asp:Button runat="server" ID="cmdCancel" Text="Cancel" CommandName="Cancel" />
</
EditItemTemplate>
<
FooterTemplate>
<
asp:Button runat="server" ID="cmdAdd" Text="Add Supplier" CommandName="New" />
</
FooterTemplate>
</
asp:TemplateField>
</
Columns>
<
EmptyDataTemplate>
<
table width="500px">
<
tr style="background:#FF6600;color:White"><th>Code</th><th>Name
</th><th>Address</th><th>Contact No</th><th>Action</th></tr>
<
tr>
<
td><asp:TextBox runat="server" ID="txtCode" /></td>
<
td><asp:TextBox runat="server" ID="txtName" /></td>
<
td><asp:TextBox runat="server" ID="txtAddress" /></td>
<
td><asp:TextBox runat="server" ID="txtContactNo" /></td>
<
td><asp:Button runat="server" ID="cmdAdd" Text="Add Supplier" CommandName="EmptyNew" /></td>
</
tr>
</
table>
</
EmptyDataTemplate>
</
asp:GridView>


Where each column implemented under Template Column. It gives us another opportunity to rearrange the GridView like Header Column, Column Ordering, Prompt user before Deleting a row of the GridView by confirm() method of javascript etc. Since we supplied Edit, Update, Cancel, & Delete command CommandName property to Edit,Update, Cancel, & Delete respectively into the GridView declaration to cooperate with SqlDataSource to enable users to Update and Delete data without any further implementation. Now look at the FooterTemplate of each column. This is because we are using FooterTemplate for our Insert operation. Add FotterTemplate for each column by server side control based on datatype. Since tblSupplier contains each column of datatype string so i need four TextBox here. In the last Template column headed by Action I added a Button with CommandName property=New. Now when you run this application what you see?


Look at the FooterTemplate of the GridView. Now we need to bind four TextBox data with SqlDataSource after clicking on the Add Supplier button. So first we need catch the click event of Add Supplier button. Gridview gives us an event to resolve such type of problem. The event name is RowCommand. Now we need to implement the RowCommand. But questions are how we can identify which button user pressed to fire this event? Answer is CommandName property. So the GridView1_RowCommand() method code is:

protected void GridView1_RowCommand(object sender, GridViewCommandEventArgs e)
{
if (e.CommandName == "EmptyNew")
{
Code.Direction =
ParameterDirection.Input;
Code.Value = ((
TextBox)GridView1.Controls[0].Controls[0].FindControl("txtCode")).Text;
Name.Direction =
ParameterDirection.Input;
Name.Value = ((
TextBox)GridView1.Controls[0].Controls[0].FindControl("txtName")).Text;
Address.Direction =
ParameterDirection.Input;
Address.Value = ((
TextBox)GridView1.Controls[0].Controls[0].FindControl("txtAddress")).Text;
ContactNo.Direction =
ParameterDirection.Input;
ContactNo.Value = ((
TextBox)GridView1.Controls[0].Controls[0].FindControl("txtContactNo")).Text;
dsSupplier.Insert();
}

if
(e.CommandName == "New")
{
Code.Direction =
ParameterDirection.Input;
Code.Value = ((TextBox)GridView1.Controls[0].Controls[0].FindControl("txtCode")).Text;
Name.Direction =
ParameterDirection.Input;
Name.Value = ((
TextBox)GridView1.FooterRow.FindControl("txtName")).Text;
Address.Direction =
ParameterDirection.Input;
Address.Value = ((
TextBox)GridView1.FooterRow.FindControl("txtAddress")).Text;
ContactNo.Direction =
ParameterDirection.Input;
ContactNo.Value = ((
TextBox)GridView1.FooterRow.FindControl("txtContactNo")).Text;
dsSupplier.Insert();
}
}


The CommandName "EmptyNew" i will discuss later in this post. To add SqlParameter into the SqlDataSource i need to use four SqlParameter(or you can use List collection) variable. Declare the below four variables within page scope.

private System.Data.SqlClient.SqlParameter Code = new System.Data.SqlClient.SqlParameter("Code", SqlDbType.Char, 6);

private System.Data.SqlClient.SqlParameter Name = new System.Data.SqlClient.SqlParameter("Name", SqlDbType.VarChar, 100);

private System.Data.SqlClient.SqlParameter Address = new System.Data.SqlClient.SqlParameter("Address", SqlDbType.VarChar, 200);

Private System.Data.SqlClient.SqlParameter ContactNo = new System.Data.SqlClient.SqlParameter("ContactNo", SqlDbType.Char, 6);


When i catch the event for Add Supplier button then populate those parameters & fire Inserting event for the dsSupplier SqlDataSource object. Keep in mind that we must override the Inserting handler to assign our data into the SqlDataSource. So add below code into your page:


protected void dsSupplier_Inserting(object sender, SqlDataSourceCommandEventArgs e)
{
e.Command.Parameters.Clear();
e.Command.Parameters.Add(Code);
e.Command.Parameters.Add(Name);
e.Command.Parameters.Add(Address);
e.Command.Parameters.Add(ContactNo);
}


Now everything is completed but we can do nothing if the table has no row in database. Gridview show nothing. The solution is EmptyDataTemplate. See the above GridView HTML code. Here i also added another Button which CommandName is EmptyNew. Hope now you can understand why i implement the GridView1_RowCommand in this way.

Thursday, March 5, 2009

A list of Keyboard Shortcuts in SQL Query Analyzer


Please visit my new Web Site WWW.Codedisplay.com


In most of the time developers need to prepare query for reports. So if we know the shortcuts of query analyzer we can increase operational excellence as well as own productivity. Hope the below list of shortcuts will help us more.

A list of Keyboard Shortcuts in SQL Query Analyzer:
KeyDescriptionKeyDescription
CTRL-SHIFT-F2Clear all bookmarks.CTRL+F2Insert or remove a bookmark (toggle).
F2Move to next bookmark.SHIFT+F2Move to previous bookmark.
ALT+BREAKCancel a query.CTRL+OConnect.
CTRL+F4Disconnect.CTRL+F4Disconnect and close child window.
ALT+F1Database object information.CTRL+SHIFT+DELClear the active Editor pane.
CTRL+SHIFT+CComment out code.CTRL+C or Ctrl+InsertCopy
CTRL+X or Shift+DelCutSHIFT+TABDecrease indent.
CTRL+DELDelete through the end of a line in the Editor pane.CTRL+FFind.
CTRL+GGo to a line number.TABIncrease indent.
CTRL+SHIFT+LMake selection lowercase.CTRL+SHIFT+UMake selection uppercase.
CTRL+V or Shift+InsertPaste.CTRL+SHIFT+RRemove comments.
F3Repeat last search or find next.CTRL+HReplace.
CTRL+ASelect all.CTRL+ZUndo.
F5 or Ctrl + EExecute a query.F1Help for Query Analyzer.
SHIFT+F1Help for the selected Transact-SQL statement.F6Switch between query and result panes.
Shift+F6Switch panes.CTRL+WWindow Selector.
CTRL+NNew Query window.F8Object Browser (show/hide).
F4Object Search.CTRL+F5Parse the query and check syntax.
CTRL+PPrintCTRL+DDisplay results in grid format.
CTRL+TDisplay results in text format.CTRL+BMove the splitter.
CTRL+SHIFT+FSave results to file.CTRL+RShow Results pane (toggle).
CTRL+SHIFT+MReplace template parameters.CTRL+LDisplay estimated execution plan.
CTRL+KDisplay execution plan (toggle ON/OFF).CTRL+IIndex Tuning Wizard.
CTRL+SHIFT+SShow client statisticsCTRL+SHIFT+TShow server trace.
CTRL+UUsedatabase


Ref: http://www.odetocode.com/

Tuesday, March 3, 2009

Displaying inline Master/Detail data in a Gridview


Please visit my new Web Site WWW.Codedisplay.com


Most of our web application needs to implement one-to-many relationships. So when we want to design such type of relationships in UI, at first we want to show the list of parents then show its corresponding child records. For example a company wants to see a list of suppliers as well as in one time also wants to see the product list that the supplier responsible to supply. For simplicity here i use datatable(one can fill datatable from database easily) to keep my example as simple as possible. Here i want to develop the below UI To display Master Detail record:


Here the main task is to design the gridviews. To do that here i am considering one master gridview & then i want to put another gridview in a template column to represent child records. Initially i will hide all corresponding child records by using javascript method & show a collapse icon in the detail column. So user can show hide the child records based on a master record. The aspx page code is given below:
<asp:GridView runat="server" ID="gvMasterDetail" DataKeyNames="ID" OnRowDataBound="gvMasterDetail_RowDataBound">
<Columns>

<asp:BoundField ItemStyle-Width="5%" DataField="Code" HeaderText="Code"></asp:BoundField>
<asp:BoundField ItemStyle-Width="15%" DataField="Name" HeaderText="Name"></asp:BoundField>
<asp:BoundField ItemStyle-Width="15%" DataField="Address" HeaderText="Address"></asp:BoundField>
<asp:BoundField ItemStyle-Width="12%" DataField="Contact" HeaderText="Contact no"> </asp:BoundField>

<asp:TemplateField HeaderText="Details">
<ItemTemplate>

<img src="Image/Expand.jpg" onclick="ChildBlock(this,document.getElementById('<%#Eval("ID") %>'));" />

<div id='<%#Eval("ID") %>' style="display:none">
<asp:GridView runat="server" ID="gvChild" DataKeyNames="ID">
<Columns>
<asp:BoundField DataField="Code" HeaderText="Code"></asp:BoundField>
<asp:BoundField DataField="Product Name" HeaderText="Product Name"></asp:BoundField>
<asp:BoundField DataField="Unit" HeaderText="Unit">
</asp:BoundField>
</Columns>
</asp:GridView>
</div>

</ItemTemplate>
</asp:TemplateField>

</Columns>
</asp:GridView>

To show & hide child div records i am using a javascript method which is given below. You can also use this javascript method To show & hide a div:
function ChildBlock(img,obj)
{
if(obj.style.display=='none')
{
obj.style.display='';
img.src="Image/Collapse.jpg";
}
else
{
obj.style.display='none';
img.src="Image/Expand.jpg";
}
}

Now we need to populate relational data. For simplicity i am using datatable. One can change this code to fit database data. The code under page load is:
if (!IsPostBack)
{
DataTable dtSupplier = new DataTable("Supplier");
dtSupplier.Columns.Add(new DataColumn("ID", System.Type.GetType("System.UInt64")));
dtSupplier.Columns.Add(new DataColumn("Code"));
dtSupplier.Columns.Add(new DataColumn("Name"));
dtSupplier.Columns.Add(new DataColumn("Address"));
dtSupplier.Columns.Add(new DataColumn("Contact"));

dtSupplier.Rows.Add(1, "st0001", "S.R. Steel", "Uttara, Dhaka", "01711xxxxxx");
dtSupplier.Rows.Add(2, "ir0039", "Shadesh builders", "Rampura, Dhaka", "01711yyyyyy");
dtSupplier.Rows.Add(3, "cr0042", "Orchard confec.", "Shahabag, Dhaka", "01711zzzzzz");
dtSupplier.Rows.Add(4, "er0078", "Windblow", "Mirpur, Dhaka", "01711qqqqqq");
dtSupplier.Rows.Add(5, "bd0301", "Rahimkarim", "Badda, Dhaka", "01711oooooo");

//Read Child Data Here
DataTable dtProducts = new DataTable("Products");
dtProducts.Columns.Add(new DataColumn("ID", System.Type.GetType("System.UInt64")));
dtProducts.Columns.Add(new DataColumn("Code"));
dtProducts.Columns.Add(new DataColumn("Product Name"));
dtProducts.Columns.Add(new DataColumn("Unit"));
dtProducts.Columns.Add(new DataColumn("SupplierID", System.Type.GetType("System.UInt64")));

dtProducts.Rows.Add(1, "PR0001", "AXE", "Dozen", 2);
dtProducts.Rows.Add(2, "PR0039", "LUX", "Qty", 2);
dtProducts.Rows.Add(1, "PR0001", "Dove", "Cartoon", 2);

Session["Products"] = dtProducts;

gvMasterDetail.DataSource = dtSupplier;
gvMasterDetail.DataBind();
}

Now to bind child gridview i am implementing RowDataBound method of the master gridview. The code like:
protected void gvMasterDetail_RowDataBound(object sender, GridViewRowEventArgs e)
{
if (e.Row.RowType == DataControlRowType.DataRow)
{
DataTable dtProducts = GetProducts(Convert.ToUInt64(((DataRowView)e.Row.DataItem)["ID"]));
((GridView)e.Row.FindControl("gvChild")).DataSource = dtProducts;
((GridView)e.Row.FindControl("gvChild")).DataBind();
}
}

In the above code segment i used a fuction named GetProducts. When gridview bind one master data then RowDataBound event will fire & call this method by master data id to populate child record. Here you can return a datasource to the child gridview based on master gridview Row DataItem ID value. Here i am showing how i filtered my child data:
private DataTable GetProducts(UInt64 nSupplierID)
{
DataTable dtProducts = (DataTable)Session["Products"];
DataTable dtClone = dtProducts.Clone();
foreach (DataRow oItem in dtProducts.Rows)
{
if (Convert.ToUInt64(oItem["SupplierID"]) == nSupplierID)
dtClone.Rows.Add(oItem.ItemArray);
}
return dtClone;
}

Hope this example will help you. If you need more complex structure to design then read:
http://www.codeproject.com/KB/webforms/MasterDetail.aspx

Javascript: How to set/get cursor position of a textarea


Please visit my new Web Site WWW.Codedisplay.com


Basically when we want to create an editor like interface then set or get cursor postion is one of the most important task. Here i want to share two cross-browser supported javascript methods which will meet your requirements To Set cursor position into a TextArea & To Get cursor position from TextArea:

Get cursor postion using javascript method:
function GetCursorPosition()
{
// HERE txt is the text field name
var obj=document.getElementById('<%= txt.ClientID %><%= txt.ClientID %>');
var CurPos = 0;

//FOR IE
if (document.selection)
{
obj.focus ();
var Sel = document.selection.createRange();
Sel.moveStart ('character', -obj.value.length);
CurPos = Sel.text.length;
}

// For Firefox
else if (obj.selectionStart obj.selectionStart == '0')
CurPos = obj.selectionStart;
return CurPos;
}

Set cursor postion using javascript method:
function SetCursorPosition(pos)
{
// HERE txt is the text field name
var obj=document.getElementById('<%= txt.ClientID %><%= txt.ClientID %>');

//FOR IE
if(obj.setSelectionRange)
{
obj.focus();
obj.setSelectionRange(pos,pos);
}

// For Firefox
else if (obj.createTextRange)
{
var range = obj.createTextRange();
range.collapse(true);
range.moveEnd('character', pos);
range.moveStart('character', pos);
range.select();
}
}

Script tested for below Browsers:
1. Internet Explorer
2. Mozilla Firefox
3. Opera
4. Google Chrome

Transfer records from one gridview to another gridview


Please visit my new Web Site WWW.Codedisplay.com


Transfer records from listview to another listview is a common task but sometimes client wants more which will be difficult to implement using such type of controls. In that case developer may choose gridview as another option where developer will get more flexibility with less effort. Here i am showing an example on that issue. Have a look at the picture & then go for implementation:


To do that we need two gridviews & two buttons. So add the below code in your aspx page:
<asp:GridView runat="server" ID="gvLeft" DataKeyNames="ID" AutoGenerateColumns="false">
<Columns>
<asp:TemplateField HeaderText="Select">
<ItemTemplate>
<asp:CheckBox runat="server" ID="chk"/>
</ItemTemplate>
</asp:TemplateField>
<asp:BoundField DataField="Code" HeaderText="Supplier code"> </asp:BoundField>
<asp:BoundField DataField="Name" HeaderText="Supplier name"> </asp:BoundField>
</Columns>
</asp:GridView>

<asp:Button runat="server" ID="cmdRight" Text=">>>>" OnClick="cmdRight_Click"/>
<asp:Button runat="server" ID="cmdLeft" Text="<<<<" OnClick="cmdLeft_Click"/>

<asp:GridView runat="server" ID="gvRight" EmptyDataText="NO DATA FOUND" DataKeyNames="ID">
<Columns>
<asp:TemplateField HeaderText="Select">
<ItemTemplate>
<asp:CheckBox runat="server" ID="chk"/>
</ItemTemplate>

</asp:TemplateField>
<asp:BoundField DataField="Code" HeaderText="Supplier code"> </asp:BoundField>
<asp:BoundField DataField="Name" HeaderText="Supplier name"> </asp:BoundField>
</Columns>
</asp:GridView>

<asp:Button runat="server" ID="cmdUpdate" Text="Update" OnClick="cmdUpdate_Click"/>

Now we need to populate left side gridview. You can populate data from database but for simplicity here i am using datatable to provide "Paste & Run" facility. Write the below codes under page load event:
if (!IsPostBack)
{
DataTable dtLeft = new DataTable("Supplier");

dtLeft.Columns.Add(new DataColumn("ID", System.Type.GetType("System.UInt64")));
dtLeft.Columns.Add(new DataColumn("Code"));
dtLeft.Columns.Add(new DataColumn("Name"));

dtLeft.Rows.Add(1, "st0001", "S.R. Steel");
dtLeft.Rows.Add(2, "ir0039", "Shadesh builders");
dtLeft.Rows.Add(3, "cr0042", "Orchard confec.");
dtLeft.Rows.Add(4, "er0078", "Windblow");
dtLeft.Rows.Add(5, "bd0301", "Rahimkarim");

gvLeft.DataSource = dtLeft;
gvLeft.DataBind();

DataTable dtRight = dtLeft.Clone();
dtRight.Rows.Add(6, "qq0000", "I.j.k ALAM");

gvRight.DataSource = dtRight;
gvRight.DataBind();

ViewState["dtLeft"] = dtLeft;
ViewState["dtRight"] = dtRight;
}

Now we need to make response when user wants to transfer data. To do that write the below server side method under two right & left navigation button click event respectively.
protected void cmdRight_Click(object sender, EventArgs e)
{
DataTable dtLeft = (DataTable)ViewState["dtLeft"];
DataTable dtRight = (DataTable)ViewState["dtRight"];
int tmp = 0;

foreach (GridViewRow oItemLeft in gvLeft.Rows)
{
if (((CheckBox)oItemLeft.FindControl("chk")).Checked)
{
dtRight.Rows.Add(gvLeft.DataKeys[oItemLeft.DataItemIndex].Value, oItemLeft.Cells[1].Text, oItemLeft.Cells[2].Text);
dtLeft.Rows.RemoveAt(oItemLeft.DataItemIndex - tmp);
tmp++;
}
}

gvRight.DataSource = dtRight;
gvRight.DataBind();
gvLeft.DataSource = dtLeft;
gvLeft.DataBind();

ViewState["dtLeft"] = dtLeft;
ViewState["dtRight"] = dtRight;
}

protected void cmdLeft_Click(object sender, EventArgs e)
{
DataTable dtLeft = (DataTable)ViewState["dtLeft"];
DataTable dtRight = (DataTable)ViewState["dtRight"];
int tmp = 0;

foreach (GridViewRow oItemRight in gvRight.Rows)
{
if (((CheckBox)oItemRight.FindControl("chk")).Checked)
{
dtLeft.Rows.Add(gvRight.DataKeys[oItemRight.DataItemIndex].Value, oItemRight.Cells[1].Text, oItemRight.Cells[2].Text);
dtRight.Rows.RemoveAt(oItemRight.DataItemIndex - tmp);
tmp++;
}
}

gvRight.DataSource = dtRight;
gvRight.DataBind();
gvLeft.DataSource = dtLeft;
gvLeft.DataBind();

ViewState["dtLeft"] = dtLeft;
ViewState["dtRight"] = dtRight;
}

Now you have to store the changes into database. To do that follow my below code under Update button:
protected void cmdUpdate_Click(object sender, EventArgs e)
{

foreach (GridViewRow oItem in gvLeft.Rows)
{
string sID=gvLeft.DataKeys[oItem.DataItemIndex].Value.ToString();
string sSQL = "UPDATE Supplier SET Status=0 WHERE ID=" + sID;
//NOW RUN EXECUTENONQUERY METHOD OR WHATEVER YOU WANT. ID NOW AVAILABLE.
}

foreach (GridViewRow oItem in gvRight.Rows)
{
string sID = gvRight.DataKeys[oItem.DataItemIndex].Value.ToString();
string sSQL = "UPDATE Supplier SET Status=1 WHERE ID=" + sID;
//NOW RUN EXECUTENONQUERY METHOD OR WHATEVER YOU WANT. ID NOW AVAILABLE.
}

}

Selecting all checkboxes within a gridview also an important task which i already described in the following post:
http://shawpnendu.blogspot.com/2009/02/selecting-all-check-boxes-in-gridview.html
Want To Search More?
Google Search on Internet
Subscribe RSS Subscribe RSS
Article Categories
  • Asp.net
  • Gridview
  • Javascript
  • AJAX
  • Sql server
  • XML
  • CSS
  • Free Web Site Templates
  • Free Desktop Wallpapers
  • TopOfBlogs
     
    Free ASP.NET articles,C#.NET,VB.NET tutorials and Examples,Ajax,SQL Server,Javascript,Jquery,XML,GridView Articles and code examples -- by Shawpnendu Bikash