


Please visit my new Web Site https://coderstechzone.com
For each & every database driven web application development based on asp.net, no one can avoid the asp.net powerful control GridView because of its set of builtin capabilities & a long list of extensions & improvements. The GridView control provides us the infrastructure for in-place Editing & Deleting. But for Insertion its left for developers(strange). Here i am showing how you can Insert/Update/Delete data using GridView with minimum coding. You can implement Update/Delete without writing a single line of code thats why at first i am showing Update & delete operations & in the later section i will describe how to Insert.
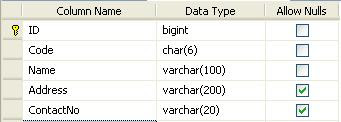
Atfirst we need to create a table in SQL Server database. For this example i use the below table named tblSupplier:
Now open a new asp.net application. To connect to the database we need to make a connectionstring first. So open the web.config file and add your connectionstring. The connectionstring looks like:
Atfirst we need to create a table in SQL Server database. For this example i use the below table named tblSupplier:

Now open a new asp.net application. To connect to the database we need to make a connectionstring first. So open the web.config file and add your connectionstring. The connectionstring looks like:
<connectionStrings>
<add name="TestConnection"connectionString="Data Source=.\SQLEXPRESS;Initial Catalog=TESTDB;Trusted_Connection=yes;"
providerName="System.Data.SqlClient"/>
</connectionStrings>
<add name="TestConnection"connectionString="Data Source=.\SQLEXPRESS;Initial Catalog=TESTDB;Trusted_Connection=yes;"
providerName="System.Data.SqlClient"/>
</connectionStrings>
Now open your page & add a SqlDataSource control. Now click right mouse button on the control. Goto Configure Data Source. Now in the popup dropdownmenu you will see your connectionstring:

Now click on next. From next select the tablename plus columns. Then click on advance and check Generate Insert, Update, and Delete statements checkbox. For this example this should be:

Ok now our page is ready to transfer data with database. To display data now add a GridView control in your page. Set the Data Souurce plus check Enable Editing & Enable Deleting like:

Now the code of the GridView looks like below:
<
asp:GridView ID="GridView1" runat="server" Width="500px" AutoGenerateColumns="False" DataKeyNames="ID" DataSourceID="dsSupplier" AutoGenerateDeleteButton="True" AutoGenerateEditButton="True"><Columns>
<asp:BoundField DataField="Code" HeaderText="Code" />
<asp:BoundField DataField="Name" HeaderText="Name" />
<asp:BoundField DataField="Address" HeaderText="Address" />
<asp:BoundField DataField="ContactNo" HeaderText="ContactNo" />
</Columns>
</asp:GridView>
You can change the order of the column by rearranging the BoundField from page source code. Now our page is ready to run. Run the page. Now you can Edit & Delete the data from GridView. Since we don't implement Insert operation yet so insert few data into the Database table then run the application otherwise you can't do the edit/delete operation. The page now looks like:

Now you can Edit & Delete data from your page which rquires just few clicks.
Now Inserting. It requires few tricks to implement. First we need to modify our GridView code like:
<
asp:GridView ID="GridView1" runat="server" AutoGenerateColumns="False" DataKeyNames="ID"DataSourceID="dsSupplier" OnRowCommand="GridView1_RowCommand" ShowFooter="True">
<Columns>
<asp:TemplateField HeaderText="Code">
<ItemTemplate><%# Eval("Code") %></ItemTemplate>
<EditItemTemplate>
<asp:TextBox runat="server" ID="Code" Text='<%# Bind("Code")%>' />
</EditItemTemplate>
<FooterTemplate>
<asp:TextBox runat="server" ID="txtCode" Text='' />
</FooterTemplate>
</asp:TemplateField>
<asp:TemplateField HeaderText="Name">
<ItemTemplate><%# Eval("Name") %></ItemTemplate>
<EditItemTemplate>
<asp:TextBox runat="server" ID="EditName" Text='<%# Bind("Name")%>' />
</EditItemTemplate>
<FooterTemplate>
<asp:TextBox runat="server" ID="txtName" Text='' />
</FooterTemplate>
</asp:TemplateField>
<asp:TemplateField HeaderText="Address">
<ItemTemplate><%# Eval("Address") %></ItemTemplate>
<EditItemTemplate>
<asp:TextBox runat="server" ID="EditAddress" Text='<%# Bind("Address")%>' />
</EditItemTemplate>
<FooterTemplate>
<asp:TextBox runat="server" ID="txtAddress" Text='' />
</FooterTemplate>
</asp:TemplateField>
<asp:TemplateField HeaderText="Contact No">
<ItemTemplate><%# Eval("ContactNo") %></ItemTemplate>
<EditItemTemplate>
<asp:TextBox runat="server" ID="EditContactNo" Text='<%# Bind("ContactNo")%>' />
</EditItemTemplate>
<FooterTemplate>
<asp:TextBox runat="server" ID="txtContactNo" Text='' />
</FooterTemplate>
</asp:TemplateField>
<asp:TemplateField HeaderText="Action">
<ItemTemplate>
<asp:Button runat="server" ID="cmdEdit" Text="Edit" CommandName="Edit" />
<asp:Button runat="server" ID="cmdDelete" OnClientClick="return confirm('Are you sure to delete')" Text="Delete" CommandName="Delete" />
</ItemTemplate>
<EditItemTemplate>
<asp:Button runat="server" ID="cmdUpdate" Text="Update" CommandName="Update" />
<asp:Button runat="server" ID="cmdCancel" Text="Cancel" CommandName="Cancel" />
</EditItemTemplate>
<FooterTemplate>
<asp:Button runat="server" ID="cmdAdd" Text="Add Supplier" CommandName="New" />
</FooterTemplate>
</asp:TemplateField>
</Columns>
<EmptyDataTemplate>
<table width="500px">
<tr style="background:#FF6600;color:White"><th>Code</th><th>Name
</th><th>Address</th><th>Contact No</th><th>Action</th></tr>
<tr>
<td><asp:TextBox runat="server" ID="txtCode" /></td>
<td><asp:TextBox runat="server" ID="txtName" /></td>
<td><asp:TextBox runat="server" ID="txtAddress" /></td>
<td><asp:TextBox runat="server" ID="txtContactNo" /></td>
<td><asp:Button runat="server" ID="cmdAdd" Text="Add Supplier" CommandName="EmptyNew" /></td>
</tr>
</table>
</EmptyDataTemplate>
</asp:GridView>
Where each column implemented under Template Column. It gives us another opportunity to rearrange the GridView like Header Column, Column Ordering, Prompt user before Deleting a row of the GridView by confirm() method of javascript etc. Since we supplied Edit, Update, Cancel, & Delete command CommandName property to Edit,Update, Cancel, & Delete respectively into the GridView declaration to cooperate with SqlDataSource to enable users to Update and Delete data without any further implementation. Now look at the FooterTemplate of each column. This is because we are using FooterTemplate for our Insert operation. Add FotterTemplate for each column by server side control based on datatype. Since tblSupplier contains each column of datatype string so i need four TextBox here. In the last Template column headed by Action I added a Button with CommandName property=New. Now when you run this application what you see?

Look at the FooterTemplate of the GridView. Now we need to bind four TextBox data with SqlDataSource after clicking on the Add Supplier button. So first we need catch the click event of Add Supplier button. Gridview gives us an event to resolve such type of problem. The event name is RowCommand. Now we need to implement the RowCommand. But questions are how we can identify which button user pressed to fire this event? Answer is CommandName property. So the GridView1_RowCommand() method code is:
protected void GridView1_RowCommand(object sender, GridViewCommandEventArgs e)
{
if (e.CommandName == "EmptyNew")
{
Code.Direction = ParameterDirection.Input;
Code.Value = ((TextBox)GridView1.Controls[0].Controls[0].FindControl("txtCode")).Text;
Name.Direction = ParameterDirection.Input;
Name.Value = ((TextBox)GridView1.Controls[0].Controls[0].FindControl("txtName")).Text;
Address.Direction = ParameterDirection.Input;
Address.Value = ((TextBox)GridView1.Controls[0].Controls[0].FindControl("txtAddress")).Text;
ContactNo.Direction = ParameterDirection.Input;
ContactNo.Value = ((TextBox)GridView1.Controls[0].Controls[0].FindControl("txtContactNo")).Text;
dsSupplier.Insert();
}
if (e.CommandName == "New")
{
Code.Direction = ParameterDirection.Input;
Code.Value = ((TextBox)GridView1.Controls[0].Controls[0].FindControl("txtCode")).Text;
Name.Direction = ParameterDirection.Input;
Name.Value = ((TextBox)GridView1.FooterRow.FindControl("txtName")).Text;
Address.Direction = ParameterDirection.Input;
Address.Value = ((TextBox)GridView1.FooterRow.FindControl("txtAddress")).Text;
ContactNo.Direction = ParameterDirection.Input;
ContactNo.Value = ((TextBox)GridView1.FooterRow.FindControl("txtContactNo")).Text;
dsSupplier.Insert();
}
}
{
if (e.CommandName == "EmptyNew")
{
Code.Direction = ParameterDirection.Input;
Code.Value = ((TextBox)GridView1.Controls[0].Controls[0].FindControl("txtCode")).Text;
Name.Direction = ParameterDirection.Input;
Name.Value = ((TextBox)GridView1.Controls[0].Controls[0].FindControl("txtName")).Text;
Address.Direction = ParameterDirection.Input;
Address.Value = ((TextBox)GridView1.Controls[0].Controls[0].FindControl("txtAddress")).Text;
ContactNo.Direction = ParameterDirection.Input;
ContactNo.Value = ((TextBox)GridView1.Controls[0].Controls[0].FindControl("txtContactNo")).Text;
dsSupplier.Insert();
}
if (e.CommandName == "New")
{
Code.Direction = ParameterDirection.Input;
Code.Value = ((TextBox)GridView1.Controls[0].Controls[0].FindControl("txtCode")).Text;
Name.Direction = ParameterDirection.Input;
Name.Value = ((TextBox)GridView1.FooterRow.FindControl("txtName")).Text;
Address.Direction = ParameterDirection.Input;
Address.Value = ((TextBox)GridView1.FooterRow.FindControl("txtAddress")).Text;
ContactNo.Direction = ParameterDirection.Input;
ContactNo.Value = ((TextBox)GridView1.FooterRow.FindControl("txtContactNo")).Text;
dsSupplier.Insert();
}
}
The CommandName "EmptyNew" i will discuss later in this post. To add SqlParameter into the SqlDataSource i need to use four SqlParameter(or you can use List collection) variable. Declare the below four variables within page scope.
private System.Data.SqlClient.SqlParameter Code = new System.Data.SqlClient.SqlParameter("Code", SqlDbType.Char, 6);
private System.Data.SqlClient.SqlParameter Name = new System.Data.SqlClient.SqlParameter("Name", SqlDbType.VarChar, 100);
private System.Data.SqlClient.SqlParameter Address = new System.Data.SqlClient.SqlParameter("Address", SqlDbType.VarChar, 200);
Private System.Data.SqlClient.SqlParameter ContactNo = new System.Data.SqlClient.SqlParameter("ContactNo", SqlDbType.Char, 6);
When i catch the event for Add Supplier button then populate those parameters & fire Inserting event for the dsSupplier SqlDataSource object. Keep in mind that we must override the Inserting handler to assign our data into the SqlDataSource. So add below code into your page:
protected
void dsSupplier_Inserting(object sender, SqlDataSourceCommandEventArgs e){
e.Command.Parameters.Clear();
e.Command.Parameters.Add(Code);
e.Command.Parameters.Add(Name);
e.Command.Parameters.Add(Address);
e.Command.Parameters.Add(ContactNo);
}
Now everything is completed but we can do nothing if the table has no row in database. Gridview show nothing. The solution is EmptyDataTemplate. See the above GridView HTML code. Here i also added another Button which CommandName is EmptyNew. Hope now you can understand why i implement the GridView1_RowCommand in this way.


2 comments:
Please tell Me how to get the Seleted value of Dropdownlist in a gridview control........Pls reply soon in C#
I have clearly described on how to get the selected of DropdownList in a GridView Control in my below post:
http://shawpnendu.blogspot.com/2010/01/dropdownlist-radiobuttonlist-checkbox.html
Hope it will help you.
I WOULD BE DELIGHTED TO HEAR FROM YOU