Monday, July 27, 2009

How to delete multiple rows in a GridView using Asp.net


Please visit my new Web Site WWW.Codedisplay.com


You knew that GridView allow us to delete a single row at a time. Here i would like to show you "How we can remove multiple GridView rows like Gmail Deletion". First of all i assume that you can Bind Sql server data into a GridView. So to make easier this article i will show only the delete operation. Plus i will discuss on deletion problem of master child data later on this article.To do that add an extra template column in GridView to give the multiple selection to the user. User will check the checkboxes to make his multiple selection for deletion. The GridView UI HTML code looks like:

Fig: Sample UI

<asp:GridView runat="server" ID="gvBrand" DataKeyNames="ID">
<Columns>
<asp:TemplateField HeaderText="Select">
<ItemTemplate>
<asp:CheckBox runat="server" ID="chk"/>
</ItemTemplate>
<ItemStyle BackColor="#DCE8FA" HorizontalAlign="Center" />
<HeaderStyle HorizontalAlign="Center" />
<HeaderTemplate>
<input id="chkAll" onclick="javascript:GridSelectAllColumn(this, 'chk');" runat="server" type="checkbox" value="" />
</HeaderTemplate>
</asp:TemplateField>
<asp:BoundField DataField="Name" HeaderText="Name">
</asp:BoundField>
<asp:BoundField DataField="Status" HeaderText="Status">
</asp:BoundField>
</Columns>
</asp:GridView>

<asp:Button runat="server" ID="cmdDlete" Text="Delete"
OnClientClick="return confirm('Are you sure to delete?')" OnClick="cmdDlete_Click" />

CLICK HERE to read How to implement select all within the GridView.

Now look at the cmdDelete button HTML code that here i added a property named OnClientClick to prompt message "Are you sure to delete?" the user before deletion. If user click on OK then the server side event will raise & delete multiple rows from the GridView as well as from databse server. So now look at the codeto delete multiple rows from GridView:

protected void cmdDlete_Click(object sender, EventArgs e)
{
DBUtility oUtility = new DBUtility();
if (oUtility.PerformDelete(gvBrand,"tblBrand"))
RefreshGridView();
}

Here i need to explain a bit more how the above code will work. To make the above code workable you need to add a class named DBUtility in your project & write the method named PerformDelete(). The class file code is given below:

using System;
using System.Data;
using System.Data.SqlClient;
using System.Configuration;
using System.Web.UI.WebControls;

public class DBUtility
{

public DBUtility(){}

public bool PerformDelete(GridView GV,string sTableName)
{
bool bSaved = false;
string sClause = "''";
string sSQL = "";
string sConstr = "";
SqlConnection Conn;
SqlCommand comm;

sConstr = ConfigurationManager.ConnectionStrings["TestConnection"].ConnectionString;
foreach (GridViewRow oItem in GV.Rows)
{
if (((CheckBox)oItem.FindControl("chk")).Checked)
sClause += "," + GV.DataKeys[oItem.DataItemIndex].Value;
}

sSQL = "DELETE FROM " + sTableName + " WHERE " + GV.DataKeyNames.GetValue(0) + " IN(" + sClause + ")";
Conn = new SqlConnection(sConstr);
using (Conn)
{
try
{
Conn.Open();
comm = new SqlCommand(sSQL, Conn);
using (comm)
{
comm.CommandTimeout = 0;
comm.ExecuteNonQuery();
bSaved = true;
}
}
catch (Exception Ex)
{
bSaved = false;
// You can through error from here.
}
}

return bSaved;
}
}

Why i add this extra class to delete multiple rows from griview? Because most of the every developers need to do this in the maximum number of pages of a project. If i can write a common method to handle each deletion then it will keep our code clean & more managable. I knew that lot of architecture now available to ensure the reusability of code but for a beginner i think the above stated way is more easier. After that he can incorporate the above code segment into his DAL. For an example: I want to develop an Ecommerce site where i will sale different type of products. If i don't consider product stock then only the order module or shopping cart is the transactional page but the rest of the pages were basic data entry page like Category, Brand, Customer, Product, Product variation, Kit etc. In all of this page either in user or admin we need to add Multiple Delete Functionality. And here you just instantiate the DBUtility object & pass the GridView to the PerformDelete() method. Thats it just two lines of code will take care deletion issues.

Another concern:
Most the times developer has a problem to delete master table data since there is relation between master child table. Look at my above example if i have a reference table named Product to Brand table then you can not delete Brand table data. You will receive the below error:
The DELETE statement conflicted with the REFERENCE constraint "FK_tblProduct_tblBrand". The conflict occurred in database "XXXX", table "dbo.tblProduct", column 'BrandID'.
The statement has been terminated.


Fig: Relationship between Brand & Product

Hope now you can understand why error occured. To resolve this issue we have two options:
1. Add ON DELETE CASCADE constraint.
2. Delete first child data.


Add ON DELETE CASCADE constraint:
If you add ON DELETE CASCADE constraint into a table then child data automatically deleted when user perform any operation on its master table. This is easy but a bit risky. To do that first DROP the constarint like:
ALTER TABLE tblProduct
DROP CONSTRAINT FK_tblProduct_tblBrand

Now add ON DELETE CASCADE constraint in the following way:

ALTER TABLE tblProduct
ADD CONSTRAINT FK_tblProduct_tblBrand
FOREIGN KEY (BrandID)
REFERENCES tblBrand (ID) ON DELETE CASCADE

First delete child data:
Use the above technique by giving a Brand filtering option in the product page.

Hope now you can handle each issues on deletion for all basic entry pages.

Monday, July 20, 2009

Download free online game named bowman2


Please visit my new Web Site WWW.Codedisplay.com


Want to download free games? Here i will introduce a free online game to play. You will find a download link at the bottom of the post. First i want to tell you something on this GAME. Bowman2 is a free game. You can pass your time by playing it. But you need a flash player. If you don't have this no problem first download the game & then unzip & then open the file using IE. IE will guide you if you dont have flash palyer installed. Lets view few screenshots:

Fig: Main menu.


Fig: Game in action

Objectives
Master the art of shooting a bow and arrow with a mouse!
Click on the game 'settings' link in the main menu to alter game parameters. Please note: 'Show Index' displays the angle and power of your shot when you pull back an arrow. 'Critical Hit' doubles the damage if the shooting angle exceeds 45 degrees. 'Vitality' is the number of hits needed to kill an opponent or die.

Controls
To shoot an arrow, click anywhere in game window (make sure you have enough room to adjust strength and angle) and move your mouse back and down to adjust the angle and strength of your shot, and finally release the left mouse button when you're ready to shoot.


DOWNLOAD NOW (101 kb)


I have passed a lot of time with this game. Hope you will enjoy.

Sponsored By:
http://www.freeworldgroup.com

Friday, July 17, 2009

Add/Modify/Resize/Change/Delete/Drop/Rename MS SQL Server Table Column using T-SQL


Please visit my new Web Site WWW.Codedisplay.com


As a software developer or Sql Server Administrator most often we need to change a column datatype or length or rename even delete or drop. So Add/Modify/Resize/Change/Delete/Drop/Rename operations is a very common task in our daily lives. Lets start an example: Let you start inserting data into a table but getting the ERROR: String or binary data would be truncated.
The reason is you are trying to insert data which exceeds any of your existing column length. So in this scenario you have to increase the column size programatically. Another common problem is
Insert Error: Column name or number of supplied values does not match table definition. The problem is you are trying to insert n no of columns data into a table whereas table has n-1 columns. So in this scenario you need to add a column using T-Sql. Ok now i will describe how we can do this.

Focus Area:
1. Add a new column to a table
2. Modify or Resize an existing column
3. Rename an existing column
4. Drop/Delete/Remove an existing column
5. Rename a Table
6. Drop/Delete/Remove an existing Table

Add a new column to a table:
The ALTER TABLE statement include an ADD clause, followed by the new column specification like datatype & length.
ALTER TABLE Articles ADD Notes VARCHAR(MAX)

ALTER TABLE Sales ADD PartnerComission DECIMAL(18,2)
ALTER TABLE LineItem ADD SecStatus INT NOT NULL

Note: If you have a table with data then you can't add a not nullable column. The solution is first add a null column & then update this column data & then change allownull to false. If your table has no data then you can easily do what you want.

Modify or Resize an existing column:
Almost same as adding a new column except ADD will be changed to ALTER COLUMN.
Ok now we will change the allow null constraint of previous partnercomission column to false.

ALTER TABLE Sales ALTER COLUMN PartnerComission DECIMAL(18,2) NOT NULL;

Note: To change allow null property of a column to False all rows must have contains the value
for this column otherwise you will get "ERROR: 'Sales' table- Unable to modify table. Cannot insert the value NULL into column 'TableName', table 'dbo.Sales'; column does not allow nulls. INSERT fails. The statement has been terminated."

Now we want to reduce the column size of Notes column to 1000. So our query should be:

ALTER TABLE Articles ALTER COLUMN Notes VARCHAR(1000);

Note: Keep in mind that if the table Articles contains length of any Notes column data greater than 1000 then you will get the ERROR: String or binary data would be truncated.
The another change is you may want to change the datataype of an existing column. Then must keep in mind that the new datatype must be cmpatible with existing datatype otherwise you may loose data or get the ERROR: Conversion failed when converting the Previous DataType value '... ' to data type New DataType.

Rename an existing column:
EXEC sp_rename
@objname = 'TableName.OldColumnName',
@newname = 'NewColumnName',
@objtype = 'COLUMN'
For more details on sp_rename you can read MSISDN Article.

Drop/Delete/Remove an existing column:
By using the DROP COLUMN clause, one can remove an existing column. This permanently deletes the column and all of its contents or data. For example, the following command drops the Notes column from the Articles table.

ALTER TABLE Articles DROP COLUMN Notes

Rename a Table:
The builtin "sp_rename" procedure can be used to change or rename the name of an existing table. In this case, the existing name and new name must be provided.

EXEC sp_rename 'OldTableName', 'NewTableName'
For more details on sp_rename you can read MSISDN Article.

Drop/Delete/Remove an existing Table:
If you need to permanently delete or remove an existing table then you can use DROP TABLE statement which will permanently delete your table as well as data. Keep in mind that if the table under a relationship then you can not delete master table without deleting the chaild table first. The syntax for delete command is given below:
DROP TABLE TableName

Javascript Displaying/Formatting Current Date and Time in Month Name & AM/PM Format


Please visit my new Web Site WWW.Codedisplay.com


Javascript provides us the ability to format and print Date and Time of visitor local computer for our application level UI. A lot of builtin Javascript Date and Time function will help us to do this. Since Javascript won't provide us the builtin format function so that we have to write custom function to meet our client requirement. Here i will fisrt show that how we can print or display current Date & Time. After that i will show the ways how we can format Date & Time by using two custom helper function. So lets start:

Print or Displaying the Current Date and Time:

Displaying Current Date:
<script type="text/javascript">
var dCurrentDate = new Date();
var nCurrentDay = dCurrentDate.getDate();
var nCurrentMonth = dCurrentDate.getMonth();
var nCurrentYear = dCurrentDate.getFullYear();

if (nCurrentDay < 10)
nCurrentDay = "0" + nCurrentDay

if (nCurrentMonth < 10)
nCurrentMonth = "0" + nCurrentMonth

document.write("Today's date is: " + nCurrentDay + "/" + nCurrentMonth + "/" + nCurrentYear);
</script>

Displaying Current Time:
<script type="text/javascript">
var dCurrentTime = new Date()
var nCurrentHour = dCurrentTime.getHours()
var nCurrentMinute = dCurrentTime.getMinutes()

if (nCurrentHour < 10)
nCurrentHour = "0" + nCurrentHour

if (nCurrentMinute < 10)
nCurrentMinute = "0" + nCurrentMinute

document.write("Today's time is: " + nCurrentHour + ":" + nCurrentMinute)
</script>


Format Current Date(Month Name) & Time(AM/PM):

Format function to get Month:
<script type="text/javascript">
function GetMonthName(nMonth)
{
var MonthNames = new Array(12);
MonthNames[0] = "January";
MonthNames[1] = "February";
MonthNames[2] = "March";
MonthNames[3] = "April";
MonthNames[4] = "May";
MonthNames[5] = "June";
MonthNames[6] = "July";
MonthNames[7] = "August";
MonthNames[8] = "September";
MonthNames[9] = "October";
MonthNames[10] = "November";
MonthNames[11] = "December";

return MonthNames[nMonth];
}
</script>

Funtion for displaing Time in AM/PM Format:
<script type="text/javascript">
function GetTimeWithAMPM(nHour,nMinute)
{
var AMPM = "AM";
if (nHour >= 12)
{
AMPM = "PM";
nHour = nHour - 12;
}
if (nHour == 0)
nHour = 12;

if (nHour < 10)
nHour = "0" + nHour;
if (nMinute < 10)
nMinute = "0" + nMinute;

return nHour + ":" + nMinute + " " + AMPM;
}

Now our custom javascript function is ready. You can easily modify the format by using the above way. The GetMonthName() custom function will help you to write any month name in textual format. So if you want short month name then modify this function by the short month name. The GetTimeWithAMPM() custom function will take two arguments. One is hour & another one is minute. The parameter hour is the key to identify the format for AM/PM. Hope now you can format the Date & Time as per requirement.

Wednesday, July 15, 2009

Builtin JavaScript Date and Time Functions


Please visit my new Web Site WWW.Codedisplay.com


Javascript provide us a lot of Date & Time function to resolve our daily problems. In this post i will try to introduce each builtin Date & Time function with proper explanation & example. Most of the times also i can not remember all functions. So i think the below list will surely help all javascript developers. The List of builtin javascript Date & Time Function is given below:

List of builtin javascript Date & Time Function:
Function NameDescriptionOutput Range
getDate()Day of the month1 to 31
getDay()Day of the week0 to 6
getFullYear()Full 4 digit year>1999
getHours()Hour of the day0 to 23
getMilliseconds()Count from last second0 to 999
getMinutes()Count from last hour0 to 59
getMonth()No of month0 to 11. Note that 0 represent January
getSeconds()Count from last minute0 to 59
getTime()Number of milliseconds since January 01, 1970N/A
getTimezoneOffset()Difference between local time and GMT in minutes0-1439
getYear()Return Year0 to 99 for 1900 to 1999 & 4 digit from >1999
setDate()Set date1-31
setFullYear()Set full year to a date4 digit year
setHours()Set hour to a date0-23
setMilliseconds()Set milliseconds to a dateNumeric only
setMinutes()Set minute to a date0 to 59
setMonth()Set month to a date0 to 11
setSeconds()Set seconds to a date0 to 59
setYear()Set year to a dateEither 2 digit or 4 digit
toGMTString()String: GMT date and timeday dd mmm yyyy hh:mm:ss GMT
toLocaleString()toString()String: Local date & timeDepends on Operating System(OS) & Browser
valueOf()Number of milliseconds since January 01, 1970ms

For Example GO:
Format Current Date and Time
Cross-browser javascript Date diffenerence

Friday, July 10, 2009

Cross-browser javascript to create image rollovers using predownload approach


Please visit my new Web Site WWW.Codedisplay.com


What is image rollover? Basicaly image rollover means swapping or changing images between two images when user moves the mouse cursor over the image. The most popular practice in our development life is most of the times our clients want to swap or change images for onmouseover(user moves mouse over the link) & onmouseout(user moves out mouse from the link) for links in the header menus or side menus. So that you can highlight a link or give an eye catching interface to your client. Here i will try to start with a simple example then i will give you a realtime aaproach for smooth image rollover with predownload technique.

<a href="http://shawpnendu.blogspot.com/"
onmouseover
="document.imgrollover.src='Image/Expand.jpg'"
onmouseout="document.imgrollover.src='Image/Collapse.jpg'">

<
img src="Image/Collapse.jpg" name="imgrollover" style="border:0">
</a>

The above example is very simple & easy to implement. But the above script has one limitation. If you look at the script you will found that when the user moves the mouse over the image, only then the second image start loading & after completion you will see the second image. So there is a time delay or gap for first rollover which is not accepted in commercial purpose. So we need to resolve this. My sugession in this regard is, better try to predownload(load the images into the memory cache in the page loading time) the two images first so that when user moves mouse cursor over the image at the same time the 2nd image already downloaded, thats why the user experience a smooth rollover. Look at the below complete example on how we can predownload the images to make a smooth rollover. Here when user moves the mouse over the image the 2nd rollover image will appear instantly.

<head runat="server">
<title>Image Rollover Example</title>

<
script type="text/javascript">
CachedImages = new Array()
CachedImages[0] = new Image()
CachedImages[0].src = "Image/Expand.jpg"
CachedImages[1] = new Image()
CachedImages[1].src = "Image/Collapse.jpg"
</script>

</
head>

<
body>
<form id="form1" runat="server">
<div>

<
a href="http://shawpnendu.blogspot.com/"
onmouseover="document.imgrollover.src=CachedImages[0].src"
onmouseout="document.imgrollover.src=CachedImages[1].src">
<img src="Image/Collapse.jpg" name="imgrollover" style="border:0" />
</a>

</
div>
</form>
</
body>

Here look at the javascript block under head tag you will see that i use an array to predownload the images & store images into this arry when the page start loading. In the link i just refer the array contents based on mouse over & mouse out event.

Now have a look at the sample output:

Script Tested for the following browsers:
1. Internet Explorer (IE)
2. Mozilla Firefox
3.Opera
4. Google Chrome

5 Free professional dating site templates


Please visit my new Web Site WWW.Codedisplay.com


Making a website template is a time consuming as well as costly. In this post i will try to help how you will get a List of FREE WEB TEMPLATES to start your business within a couple of days. Each free templates will provide you the professional looks & feel. Just DOWNLOAD FREE TEMPLATES & start to earn money. If you are thinking to run a Love Romance or Dating site then read my post. When you start working on the dating site templates its does not require any knowledge on programming or even on design concepts. So start:

Free dating template #1:
The below template is high quality graphics template. This template has these objects: Dating,agency, man, woman, photo, profile.

Download

Free dating site template 1


Free dating template #2:
This is also a high quality graphics template. This template has these objects: Dating, photo, pics, online, couples, profiles.

Download


Free dating site template 1


Free dating template #3:

Another nice looking high quality free professional template. Source included PSD (Photoshop CS+), HTML (Macromedia Dreamweaver / Microsoft Frontpage), CSS, Fonts.

Download

Free dating site template 1


Free dating template #4:
Another nice different looking high resolution graphics free professional template from designers. Source included PSD (Photoshop CS+), HTML (Macromedia Dreamweaver / Microsoft Frontpage), CSS, Fonts.

Download

Free dating site template 1


Free dating template #5:
Another simple nice looking dating website template. Source included PSD (Photoshop CS+), HTML (Macromedia Dreamweaver / Microsoft Frontpage).

Download


Free dating site template 1


Now i would like introduce you with a little bit costly dating & wedding web sites template by templateworld. Source files included PSD, HTML, CSS, JPG. Minimum resolution Minimum Resolution 1024px required. Type CSS, XHTML, DIV-Based Design. This site requires at least 6 months membership with US$49.95. Aftre getting the membership you can download all high resolution graphics templates from all categories.

Template #1:
Free dating site template 1


Template #2:

Free dating site template 1


The above list of free high quality professional looks web templates for web designers will ease your life to start a dating or wedding site with your minimum effort. Now put your extra time for SEO works. And lets start DATE....

How to enable or disable Javascript in a web browser like Internet Explorer (IE), Mozilla Firefox, Opera


Please visit my new Web Site WWW.Codedisplay.com


If you want to view webpages with javascripts then you need to ensure your web browser is javascript enabled. Most of the users enabled javascript by default thats why developer never take care this issue. Generally you can view a web page without enabling javascript but you may miss the javascript funtionality of this web page. Web developers do a lot of work using javascript so it will be better to enable javascript of your browser before browsing. How do I check whether my browser has JavaScript enabled or not? To find the answer read my below instructions:

Focus Area:
1. Internet Explorer 7.0 or 8.0
2. Mozilla Firefox 1.5 or 3.0.8
3. Opera 8 or 9.25


Enable Javascript in Internet Explorer (IE):
Steps were given below:
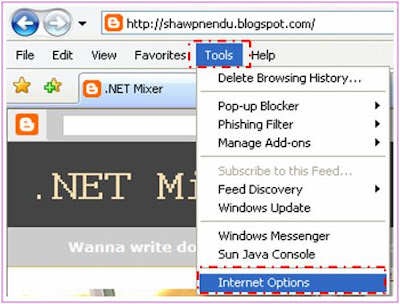
1. Go to Tools then select Internet Options.
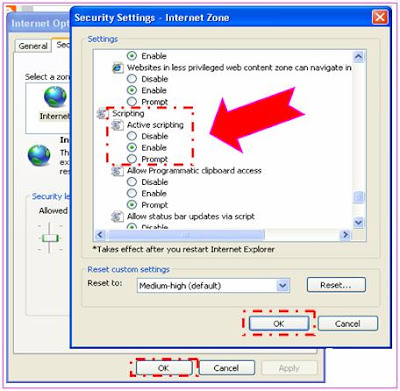
2. Select the Security tab and then click on Custom Level.
3. Scroll down up to Scripting section and choose Enabled under Active scripting section & click OK>>OK.
4. To disable javascript choose Disabled instead of Enabled stated in point 3.


Fig: Covered Step 1.

Fig: Covered Step 2.


Fig: Covered Steps 3 & 4.

Enable Javascript in Mozilla Firefox:
Steps were given below:
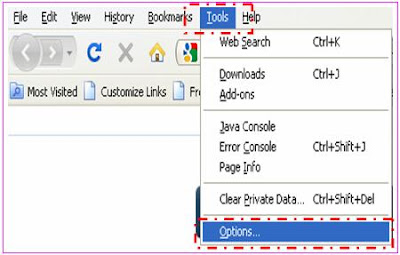
1. Go to Tools then select Options.
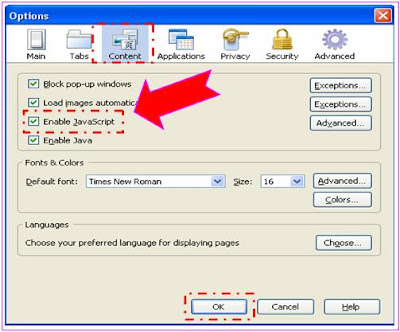
2. Select the Content tab.
3. Check Enable Javascript Checkbox.
4. Click OK.


Fig: Covered Step 1.


Fig: Covered Steps 2,3 & 4.

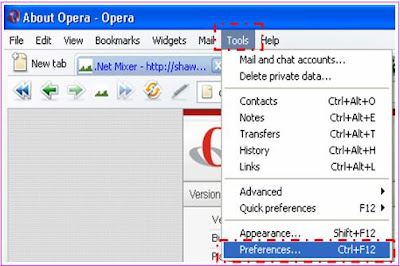
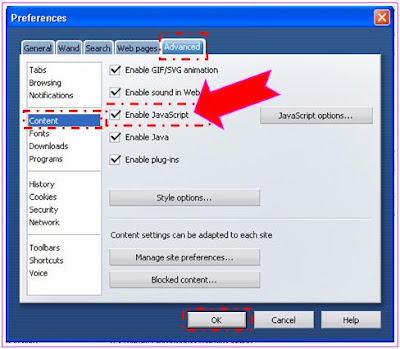
Enable Javascript in Opera:
Steps were given below:
1. Go to Tools then select Preferences.
2. Select the Advanced tab.
3. Select Content from left pane.
4. Check Enable Javascript from right pane.
5. Click OK.


Fig: Covered Step 1.


Fig: Covered Steps 2,3,4 & 5.

Thursday, July 9, 2009

Making or creating comma separated value list in a single line using SQL SP or UDF


Please visit my new Web Site WWW.Codedisplay.com


Most of the times we need to display a summary or quotation line in our page by making a comma separated value list from SQL Server table data rows. But the reality is we did not get any built in function from SQL Server. But we did it by applying few techniques. Lets for SQL Server we can use the COALESCE function, In SQL Server 2000 we can use a variable smartly in our SELECT statement. To do that here i shows technique for both SQL Server 2005 and 2000 to make a single line comma separated value from multiple rows based on a condition. Lets we have a requirement like the "XYZ" company will provide seasonal services. So that the company wants to put the all today's available services in the top level of company home page. In this scenario you can easily identify the today's services by a simple select statement with GETDATE() condition. Then you can loop through the rows and run time make a single line string to meet the requirement. But this is not the best solution as well as complex. Lets look the smart way:


Fig: Data structure

SQL Server 2005:
DECLARE @Services VARCHAR(MAX)

SELECT @Services = COALESCE(@Services+', ' , '') + [Name]
FROM Service
WHERE
GETDATE() BETWEEN StartDate AND EndDate

SELECT
@Services Services

Output: Free home TV service, Home delivery of giveaway

SQL Server 2000:
DECLARE @Services VARCHAR(8000)

SET @Services = ''

SELECT
@Services = @Services + [Name] + ','
FROM
[Service]
WHERE
GETDATE() BETWEEN StartDate AND EndDate

SELECT
SUBSTRING(@Services , 1, LEN(@Services)-1)

Output: Free home TV service, Home delivery of giveaway

TIPS:
1. Use ISNULL() to handle NULL values or filter all null values & spaces within the WHERE clause.
2. To resolve the ERROR: Invalid length parameter passed to the SUBSTRING function use case in the select statement to check the length before applying SUBSTR.
3. You can use the above technique to create your user defined function(UDF) or stored procedure(SP).

4. You can also use the above technique to create a dynamic int id list to use in IN clause within the sub query or inline query.
Want To Search More?
Google Search on Internet
Subscribe RSS Subscribe RSS
Article Categories
  • Asp.net
  • Gridview
  • Javascript
  • AJAX
  • Sql server
  • XML
  • CSS
  • Free Web Site Templates
  • Free Desktop Wallpapers
  • TopOfBlogs
     
    Free ASP.NET articles,C#.NET,VB.NET tutorials and Examples,Ajax,SQL Server,Javascript,Jquery,XML,GridView Articles and code examples -- by Shawpnendu Bikash