Thursday, December 31, 2009

Display Images in GridView from Sql Server Database Table Using Asp.net C#


Please visit my new Web Site https://coderstechzone.com


In my previous post i showed you "How one can upload images into Sql Server using Asp.net C# FileUpload control". In this post i will show you how one can display images into a GridView from Sql Server table. As you know in most of the web applications requires to handle different type of images like large,thumbnail etc. If those web applications are e-commerce site then you must be carefull when handling images. In previous post i showed how you can store images & in this post i will show you how one can display images from Sql server table. The table structure is given below:


Fig: Table structure

Displaying picture or image in a GridView is a different way then just using a image tag. In ASP.NET we can define a Handler to access the image from data base. So now we need to create a Handler to read binary data from database. To do that Right click on solution explorer and Add new item, click on Generic Handler and name it ImageHandler.ashx. Write this code in ProcessRequest method:
using System;
using System.Web;
using System.Data.SqlClient;
using System.Configuration;
using System.Data;

public class ImageHandler : IHttpHandler 
{
    
    public void ProcessRequest (HttpContext context) 
    {
        string connectionString = ConfigurationManager.ConnectionStrings["TestConnection"].ConnectionString;
        SqlConnection conn = new SqlConnection(connectionString);
        SqlCommand cmd = new SqlCommand();
        cmd.CommandText = "Select [Content] from Images where ID =@ID";
        cmd.CommandType = CommandType.Text;
        cmd.Connection = conn;

        SqlParameter ImageID = new SqlParameter("@ID", SqlDbType.BigInt);
        ImageID.Value = context.Request.QueryString["ID"];
        cmd.Parameters.Add(ImageID);
        conn.Open();
        SqlDataReader dReader = cmd.ExecuteReader();
        dReader.Read();
        context.Response.BinaryWrite((byte[])dReader["Content"]);
        dReader.Close();
        conn.Close();
    }
 
    public bool IsReusable {
        get {
            return false;
        }
    }
}
Ok now add an aspx page in your project. Add a GridView control with a template field. Within the template field define image URL like below:
<%@ Page Language="C#" AutoEventWireup="true" CodeFile="Display_images.aspx.cs" Inherits="Display_images" %>

<!DOCTYPE html PUBLIC "-//W3C//DTD XHTML 1.0 Transitional//EN" "http://www.w3.org/TR/xhtml1/DTD/xhtml1-transitional.dtd">

<html xmlns="http://www.w3.org/1999/xhtml" >
<head runat="server">
    <title>Display Images in GridView from SQL Server</title>
</head>
<body>
    <form id="form1" runat="server">
    <div>
        
        <asp:GridView ID="GVImages" runat="server" AutoGenerateColumns="false" HeaderStyle-BackColor="red" HeaderStyle-ForeColor="white">
        <Columns>
    
        <asp:BoundField DataField="ID" HeaderText="ID" />
        <asp:BoundField DataField="Name" HeaderText="Description" />
        <asp:BoundField DataField="Type" HeaderText="Type" />
    
        <asp:TemplateField HeaderText="Image">
        <ItemTemplate>
        <asp:Image ID="Image1" runat="server" 
                   ImageUrl='<%# "ImageHandler.ashx?ID=" + Eval("ID")%>'/>
        </ItemTemplate>
        </asp:TemplateField>
    
        </Columns>        
        </asp:GridView>
    
    </div>
    </form>
</body>
</html>
Now everything is set except binding sql server data into the GridView. To do that write the below code in Page_Load event:
using System;
using System.Data;
using System.Configuration;
using System.Web;
using System.Web.UI;
using System.Data.SqlClient;

public partial class Display_images : System.Web.UI.Page
{
    protected void Page_Load(object sender, EventArgs e)
    {
        if (!IsPostBack)
        {
            string connectionString = ConfigurationManager.ConnectionStrings["TestConnection"].ConnectionString;
            DataTable dt = new DataTable();
            SqlConnection conn = new SqlConnection(connectionString);
            using (conn)
            {
                SqlDataAdapter ad = new SqlDataAdapter("SELECT * FROM Images", conn);
                ad.Fill(dt);
            }
            GVImages.DataSource = dt;
            GVImages.DataBind();
        }
    }
}
Now run the project & hope you wil get a webpage like below:


Fig: Sample Output

So i think now you can display images from sql server table into a GridView. Happy programming.

Wednesday, December 30, 2009

Save Images into Sql Server Database Table using asp.net FileUpload Control


Please visit my new Web Site https://coderstechzone.com


This article will explain how one can insert or save images into a sql server database table using asp.net FileUpload control. You may ask why we will save or store images into sql server database table instead of a server folder? The answer is its easy to use, easy to manage, easy to backup as well as easy programming. But one thing you have to keep in mind that you need to extend the size of your database rather than your regular size. Always deleting images from server folder is a hectic job where security will play a great role but if you store images into sql server database you can remove images or related images by issuing a simple delete sql command.

If you want to upload images into server folder then click here.

If you want to display images from server folder into datalist then click here.

To start to explain how to store images into sql server database  or Upload images into sql server first create a below like table:


Where ID is the identity field which you will use as a foreign key when entering details data like products_images. In products_images you can easily use imageid as a thumbnail image or large image. The table columns for products_images may like ProductID, ImageType & ImageID.

Now add a webpage in your project and named it Save_Images.aspx then copy the HTML Markup code from below:
<%@ Page Language="C#" AutoEventWireup="true" CodeFile="Save_Images.aspx.cs" Inherits="Save_Images" %>

<!DOCTYPE html PUBLIC "-//W3C//DTD XHTML 1.0 Transitional//EN" "http://www.w3.org/TR/xhtml1/DTD/xhtml1-transitional.dtd">

<html xmlns="http://www.w3.org/1999/xhtml" >
<head runat="server">
    <title>How to save images into sql server database</title>
</head>
<body>
    <form id="form1" runat="server">
    <div>

        Name:        
        <asp:TextBox runat="server" ID="txt_Image_Name"></asp:TextBox><br />    
        Image Path:
        <asp:FileUpload runat="server" ID="FileUpload1" /><br /><br />
        <asp:Button runat="server" ID="cmd_Upload" Text="Upload Image" OnClick="cmd_Upload_Click" />

    </div>
    </form>
</body>
</html>

Your page will look like below:


Now under cmd_Upload button write the below server side code. For your better understanding i have put full code here:
using System;
using System.Data;
using System.Configuration;
using System.Web;
using System.Data.SqlClient;

public partial class Save_Images : System.Web.UI.Page
{
    protected void Page_Load(object sender, EventArgs e)
    {

    }
    protected void cmd_Upload_Click(object sender, EventArgs e)
    {
        string s_Image_Name = txt_Image_Name.Text.ToString();
        if (FileUpload1.PostedFile != null && FileUpload1.PostedFile.FileName != "")
        {
            byte[] n_Image_Size = new byte [FileUpload1.PostedFile.ContentLength];
            HttpPostedFile Posted_Image = FileUpload1.PostedFile;
            Posted_Image.InputStream.Read(n_Image_Size, 0, (int)FileUpload1.PostedFile.ContentLength);

            SqlConnection conn = new SqlConnection(ConfigurationManager.ConnectionStrings["TestConnection"].ConnectionString);

            SqlCommand cmd = new SqlCommand();
            cmd.CommandText = "INSERT INTO Images(Name,[Content],Size,Type)" +
                              " VALUES (@Image_Name,@Image_Content,@Image_Size,@Image_Type)";
            cmd.CommandType = CommandType.Text;
            cmd.Connection = conn;

            SqlParameter Image_Name = new SqlParameter("@Image_Name", SqlDbType.VarChar, 500);
            Image_Name.Value = txt_Image_Name.Text;
            cmd.Parameters.Add(Image_Name);

            SqlParameter Image_Content = new SqlParameter("@Image_Content", SqlDbType.Image, n_Image_Size.Length);
            Image_Content.Value = n_Image_Size;
            cmd.Parameters.Add(Image_Content);

            SqlParameter Image_Size = new SqlParameter("@Image_Size", SqlDbType.BigInt, 99999);
            Image_Size.Value = FileUpload1.PostedFile.ContentLength;
            cmd.Parameters.Add(Image_Size);

            SqlParameter Image_Type = new SqlParameter("@Image_Type", SqlDbType.VarChar, 500);
            Image_Type.Value = FileUpload1.PostedFile.ContentType;
            cmd.Parameters.Add(Image_Type);


            conn.Open();
            cmd.ExecuteNonQuery();
            conn.Close();
        }
    }
}
Now run your page give a name for your image. Then select an image to upload. For multiple upload you may read my another post CLICK HERE. Click on upload. Hope your image will be successfully uploaded. Go to the SqlServer andopen the images table. You will get a scenario like below:


So now i hope you can upload images into your sql server using FileUpload Asp.net control. In my next article i will show you how one can retrieve images from Sql Server into a GridView/DataList/Repeater control.

Wednesday, December 16, 2009

Javascript confirm message before delete from Asp.net LinkButton or Button Control


Please visit my new Web Site https://coderstechzone.com


In our Asp.Net web application a common task is to insert, update or delete data from Database. It will be a good practice if you prompt user before deleting a row or data from Database since after deletion you can not retrieve data from database. Think if user click to delete a row & you don't prompt any message then the data will be deleted. If the user click on delete Button mistakenly then what happend? So its a good idea to prompt user by using javascript confirm before deleting a row.


Fig: Output

As shown in above figure when a user clicks on a LinkButton or on a Button control system will prompt "Are you sure to delete?" javascript confirm message box with two button OK & Cancel. If user click on OK then corresponding server side code will be executed. If cancel then nothing happened.

One can prompt user by using three ways. You can use any one in LinkButton, Button Or Image Button control even within GridView, DataList or Repeater control. These are:
Way 1: Using Properties.
Way 2: From HTML Markup.
Way 3: Runtime or Programmatically.

Using Properties:
This is the most simple, easy way to prompt user confirmation message from LinkButton / Button / Image Button control property. Look at the below image how to do it.


Fig: Property window

Here i explain how you can do it. First right click on any one of your control such as LinkButton / Button / Image Button. Then go to the properties. From properties find OnClientClick attribute and write the following code:
return confirm('Are you sure to delete?');

From HTML Markup:
Its also easy. One can easily add the confirmation message from HTML Markup language of the control in the following way:

<%@ Page Language="C#" AutoEventWireup="true" CodeFile="Delete_Confirmation.aspx.cs" Inherits="Delete_Confirmation" %>

<!DOCTYPE html PUBLIC "-//W3C//DTD XHTML 1.0 Transitional//EN" "http://www.w3.org/TR/xhtml1/DTD/xhtml1-transitional.dtd">

<html xmlns="http://www.w3.org/1999/xhtml" >
<head runat="server">
<title>Javascript confirmation delete example</title>
</head>


<body>
<form id="form1" runat="server">
<div>


<asp:LinkButton ID="lnkDelete" runat="server" Text="Delete" OnClientClick="return confirm('Are you sure to delete?'); "></asp:LinkButton>
<asp:Button ID="cmdDelete" runat="server" Text="Delete" OnClientClick="return confirm('Are you sure to delete?'); " />


</div>
</form>

</body>

</html>

Runtime or Programmatically:
Its a bit advance option. In many cases you need to generate controls dynamically like if you generate a GridView in runtime & also add a LinkButton in GridView rows to give options user to delete data then you don't have any choice except it. Look at the below code how one can add dynamically javascript confirmation message on a dynamically generated LinkButton:


using System;
using System.Web.UI.WebControls;

public partial class Delete_Confirmation : System.Web.UI.Page
{
protected void Page_Load(object sender, EventArgs e)
{
if (!IsPostBack)
{
lnkDelete.Attributes.Add("onclick", "return confirm('Are you sure to delete?');");
cmdDelete.Attributes.Add("onclick", "return confirm('Are you sure to delete?');");


Button btnDelete = new Button();
btnDelete.Text = "Dynamic Control to Delete";
btnDelete.Attributes.Add("onclick", "return confirm('Are you sure to delete?');");
this.Form.Controls.Add(btnDelete);
}
}
}

Hope now one easily add javascript confirmation message for LinkButton, Button & Image Button even though these were within a GridView or DataList or a Repeater control.

Read my another post How to add confirmation message before deletion in a GridView LinkButton.

Tuesday, December 15, 2009

Change Windows startup and shutdown sounds or music


Please visit my new Web Site https://coderstechzone.com


You may does not like the default Windows startup and shutdown sounds, those are just simple music & after hearing in most the times you may borred. Thats why you may think to change your Windows startup & shutdown music that i will explain in this post step by step.

One another nice thing is one can also change other music or sounds in windows such as error sound, new hardware insert sound, empty recycle bin sound and more! To do that you can take one of your favourite mp3 which you like to hear as default windows sound.

You have to do two extra job like firts cut a portion of your selected mp3 then convert it into wav format. To cut the portion of your mp3 you can use freeware like Audacity to chop up the music. You can use a free software like JetAudio, Media-Convert to convert your audio files into WAV format. But keep in mind that the size must be less than or eqal to 1MB. It will better if you keep the size within 500KB.

Step 1: Choose your favourite mp3 song.
Step 2: Cut two portion that you like for startup & shutdown music.
Step 3: Convert mp3 portions to WAV format.
Step 4: Rename these files to Windows XP Startup.wav and Windows XP Shutdown.wav respectively.
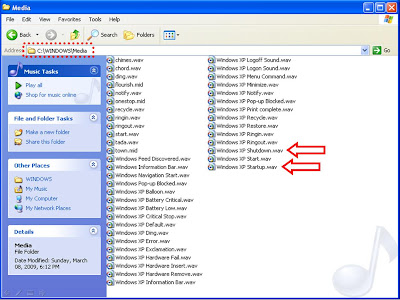
Step 5: Now click on My Computer and go to C:\Windows\Media. Here you will found the files Windows XP Startup.wav and Windows XP Shutdown.wav along with a lot of other windows sounds like error, empty reccyle bin etc.
Fig: Location of files

Step 6: Now copy the two files into another location so if your settings does not work then you can revert back.
Step 7: Now copy your two files that you have made & paste into the C:\Windows\Media folder and restart your computer to take place the changes.Now you should hear the new music or songs or sounds rather than the default sound.

If you don't like other Windows default sounds then you can alos change those by using exactly the ways that i have described.

It's really simple to change the Windows login and logoff sounds. So hope now you can do it.

Cross Page Posting or Postback in Asp.net 2.0 / 3.5


Please visit my new Web Site https://coderstechzone.com


In Asp.net 1.1 we can postback a form itself but can't posting back to other pages. This is a limitation of Asp.net 1.0. We can simulate cross page postback by using Response.Redirect or Server. Transfer that i have already describedin one of my previous post named "Passing data/parameters/values from one aspx page to another aspx page".

In Asp.net 2.0 or Asp.net 3.5 microsift gives us a solution to easily do the cross page postback that i will cover in this article. The feature known as "Cross Page PostBack" from a web form or aspx page to post back to a different or another web formor aspx page.

Asp.net 2.0 or 3.5 offers us to post back to another form by using PostBackURL property of a control that implements IButtonControl. Here note that Button, ImageButton, LinkButton has the PostBackURL property to submit one page/form to different page/form. Also provides us a FindControl Method to catch the controls of previous page or source page. By using PreviousPage property we will catch the page that has been submitted. So using PreviousPage property to catch the previous page & FindControl Method to catch the controls of this previous page.

There are two ways we can post back a form into another form. These are:
1. Direct access controls from target page
2. Direct access public properties from target page

Direct access controls from target page:
To describe this example first create a project. Then rename the default.aspx page to page1.aspx. Add one another page & rename it by page2.aspx. Here we will generate cross page postback from page1.aspx to pag2.aspx page. Now add two TextBox in source page means page1.aspx and a Button control. Set the PostBackUrl="page2.aspx" of theButton control. No server side code is required for the page1.aspx since after clicking on the page1, Button Control will submit itsself into the page2.aspx that i have specified in PostBackUrl property. Have a look at source page page1.aspx markup:


<%@ Page Language="C#" AutoEventWireup="true" CodeFile="page1.aspx.cs" Inherits="page1" %>

<!DOCTYPE html PUBLIC "-//W3C//DTD XHTML 1.0 Transitional//EN" "http://www.w3.org/TR/xhtml1/DTD/xhtml1-transitional.dtd">

<html xmlns="http://www.w3.org/1999/xhtml" >
<head runat="server">
<title>Cross page postback example 1</title>
</head>
<body>
<form id="form1" runat="server">

<div>
<asp:Label ID="lblFirstNum" runat="server">Enter First Number:</asp:Label>
<asp:TextBox ID="txtFirstNum" runat="server"></asp:TextBox>

<br />

<asp:Label ID="lbl2ndNum" runat="server">Enter 2nd Number: </asp:Label>
<asp:TextBox ID="txt2ndNum" runat="server"></asp:TextBox>

<br /><br />

<asp:Button ID="cmdCross" runat="server" Text="Click to Trigger Postback" PostBackUrl="page2.aspx" />
</div>

</form>
</body>
</html>

Now we have to do some work on page2.aspx to collect data from page1.aspx. By using PreviousPage property & FindControl Method we can easily catch data from source page. Have a look at the page2.aspx page_load event where we catch source page first number & Second number & show the cumulative result in page2.aspx page.
Code behind of page2.aspx:


using System;

using System.Web.UI.WebControls;

public partial class page2 : System.Web.UI.Page

{

protected void Page_Load(object sender, EventArgs e)

{

if(!IsPostBack)

{

if (PreviousPage != null && PreviousPage.IsCrossPagePostBack)

{

decimal nFirstNum = Convert.ToDecimal(((TextBox)PreviousPage.FindControl("txtFirstNum")).Text);

decimal n2ndNum = Convert.ToDecimal(((TextBox)PreviousPage.FindControl("txt2ndNum")).Text);

Response.Write("Sum of previous page two number is: " + (nFirstNum + n2ndNum));

}

else

{

// This is not cross page postback.

// Implement Other logic here

}

}

}

}

If you use master page then you need to give diefferent treatment to get data from cross page postback. Keep page1.aspx as it is. Only modify the page2.aspx page_load event in the following way:


using System;

using System.Web.UI.WebControls;


public partial class mPage2 : System.Web.UI.Page

{

protected void Page_Load(object sender, EventArgs e)

{

if (!IsPostBack)

{

if (PreviousPage != null && PreviousPage.IsCrossPagePostBack)

{

ContentPlaceHolder content = (ContentPlaceHolder)Page.PreviousPage.Form.FindControl("ContentPlaceHolder1");

decimal nFirstNum =Convert.ToDecimal(((TextBox)content.FindControl("txtFirstNum")).Text);

decimal n2ndNum = Convert.ToDecimal(((TextBox)content.FindControl("txt2ndNum")).Text);

Response.Write("Sum of previous page two number is: " + (nFirstNum + n2ndNum));

}

else

{

// This is not cross page postback.

// Implement Other logic here

}

}

}

}


Direct access public properties from target page:
To direct access public properties you have to create some public properties in source page which we will access from target page. To do that modify page1.aspx page server side code in the following way & keep HTML mark up as it is:


using System;

public partial class page1 : System.Web.UI.Page
{
protected void Page_Load(object sender, EventArgs e)
{
}

public decimal nFirstNum
{
get { return Convert.ToDecimal(txtFirstNum.Text); }
}

public decimal n2ndNum
{
get { return Convert.ToDecimal(txt2ndNum.Text); }
}
}

Don't forget to add the below page directives into the page2.aspx. Otherwise the next code segment will give you error since in page_load event you will acess page1 public properties. The directive is:

<%@ PreviousPageType VirtualPath="~/page1.aspx" %>

Now also modify page2.aspx page_load event in the following way:


using System;

using System.Web.UI.WebControls;


public partial class page2 : System.Web.UI.Page

{

protected void Page_Load(object sender, EventArgs e)

{

if(!IsPostBack)

{

if (PreviousPage != null && PreviousPage.IsCrossPagePostBack)

{

decimal nFirstNum = PreviousPage.nFirstNum;

decimal n2ndNum = PreviousPage.n2ndNum;

Response.Write("Sum of previous page two number is: " + (nFirstNum + n2ndNum));

}

else

{

// This is not cross page postback.

// Implement Other logic here

}

}

}

}


The Output will be like this:

Fig: Output

Note:
If your source page has more than one control that implements IButtonControl than you can define different target page fordifferent controls.

In this example i showed you how to make Cross Page Posting or postback in ASP.NET 2.0 / 3.5 using C#. Hope it will help.

Monday, December 14, 2009

Bind images from folder to DataList


Please visit my new Web Site https://coderstechzone.com


If you are looking for how to bind images from database to DataList or GridView i hope you will get a lot of example for it. But in this article here i will show you "How one can bind images from server folder to a DataList". Its a bit easy in Asp.Net since Asp.Net provides us a really efficient namespace "System.IO". In this post i will first read the folder where images stored then read all file names if file has a valid extension for images then stored into a list. After that i will bind those list into the DataList. Within DataList i will use an Image control and HyperLink control to display images & name respectively. Here you can also filter image file extension like bmp, jpeg, jpg, png, gif whatever you want. In this example i only consider Jpeg, Jpg, Gif format files or images.

OUTPUT:

Fig: Images within DataList

Complete HTML Markup Code:
<%@ Page Language="C#" AutoEventWireup="true" CodeFile="Datalist_Image.aspx.cs" Inherits="Datalist_Image" %>

<!DOCTYPE html PUBLIC "-//W3C//DTD XHTML 1.0 Transitional//EN" "http://www.w3.org/TR/xhtml1/DTD/xhtml1-transitional.dtd">

<html xmlns="http://www.w3.org/1999/xhtml" >
<head runat="server">
<title>Bind images from Folder to Datalsit</title>
</head>

<body>

<form id="form1" runat="server">

<div>

<asp:DataList ID="DataList1" runat="server" RepeatColumns="5" CellPadding="5">
<ItemTemplate>
<asp:Image Width="100" ID="Image1" ImageUrl='<%# Bind("Name", "~/Images/Books/{0}") %>' runat="server" />
<br />
<asp:HyperLink ID="HyperLink1" Text='<%# Bind("Name") %>' NavigateUrl='<%# Bind("Name", "~/Images/Books/{0}") %>' runat="server"/>
</ItemTemplate>
<ItemStyle BorderColor="silver" BorderStyle="dotted" BorderWidth="3px" HorizontalAlign="Center"
VerticalAlign="Bottom" />
</asp:DataList>

</div>

</form>

</body>

</html>

Code behind/Server side code:
using System;
using System.Collections;
using System.IO;

public partial class Datalist_Image : System.Web.UI.Page
{

protected void Page_Load(object sender, EventArgs e)
{

if (!IsPostBack)
{
DirectoryInfo dir = new DirectoryInfo(MapPath("Images/Books"));
FileInfo[] files = dir.GetFiles();
ArrayList list = new ArrayList();
foreach (FileInfo oItem in files)
{
if (oItem.Extension == ".jpg" oItem.Extension == ".jpeg" oItem.Extension == ".gif")
list.Add(oItem);
}
DataList1.DataSource = list;
DataList1.DataBind();
}

}
}

Hope now you can bind server side folder images into the DataList as well as can bind folder image list into the GridView.

Saturday, December 12, 2009

Display hidden files when Folder Options Removed by Virus


Please visit my new Web Site https://coderstechzone.com


Some viruses play a hide & seek role with windows users By removing the folder options sub menu from Tools menu. Then user cried that they had lost their valuable files where as the virus just hide those as hidden or system files. Such type of virus mainly came from Indonesia. Basically they are not harmful for your computer except they hide your valuable files & modify the registry to hide the Folder Options from Tools menu.

If you do not found the Folder Options Menu from Tools menu then you can take the below steps.

Step by step figures to recover hidden files:
1. Click on start menu.
2. Click on Run.
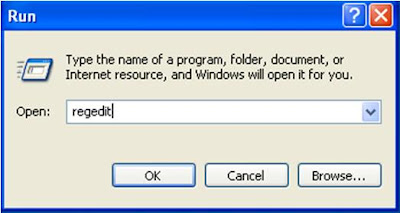
3. Type regedit & press Enter.

Fig: Covered up to step 3.

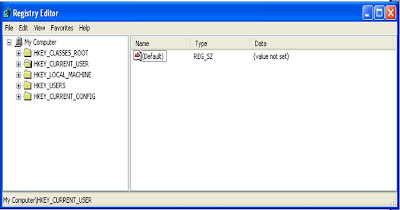
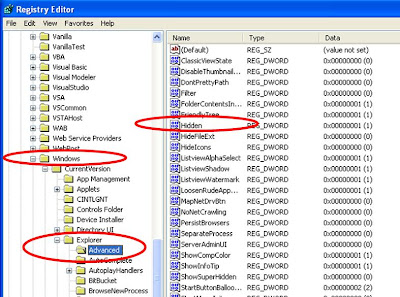
4. Find HKEY_CURRENT_USER node & expand it.

Fig: Covered Step up to 4.

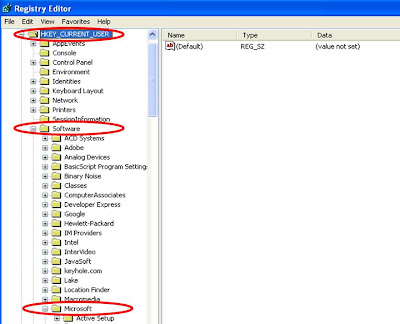
5. Now find Software node & expand it.
6. Now Find Microsoft node & expand it.


Fig: Covered up to Step 6

7. Now go to Windows\Currentversion\Explorer node.
8. Now click on Advannced node.
9. Now double click on Hidden link from right side list.


Fig: Covered up to Step 9.

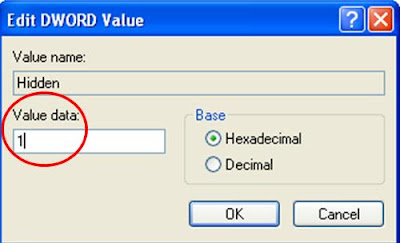
10. Now change 0 to 1 in Value data field.
11. Now click on OK.

Fig: The End.

Hope now you can view all hidden files from windows even spam or trozan or virus remove Folder Options from your computer Windows XP.

Tuesday, December 8, 2009

Javascript to get CheckBoxList value


Please visit my new Web Site https://coderstechzone.com


To read CheckBoxList Selected Value, Selected Index & Selected Text in serverside is an easy job but using javascript its a bit difficult. In this article i want to share with you how one can read CheckBoxList SelectedValue, SelectedIndex & SelectedText by using javascript. Before explanation i want to share with you that getting SelectedIndex & SelectedText from javascript is a bit easy rather than SelectedValue because there is no direct way to read SelectedValue from CheckBoxList. To do that you have to work a bit hard like in databound time of CheckBoxList you have to add an attribute named ALT as value. Then from checkbox array you can read the ALT value as SelectedValue. There is no easy alternative not found yet. If you do not want to read Selected Value of CheckBoxList then please remove the CheckBoxList1_DataBound method from server side code that i will show you later. Also remove variable spanArray, sValue & its related lines from javascript.

If you are looking for Jquery solution then CLICK HERE.

Focus Area:
1. How to get SelectedValue from CheckBoxList using javascript.
2. How to get SelectedText from CheckBoxList using javascript.
3. How to get SelectedIndex from CheckBoxList using javascript.
4. How to bind sql server data into CheckBoxList using Asp.net.


To do that first of all create a table like below:


Here i am considering that the table name is Article. Now add an aspx page in your project and write the HTML Markup like below:
<%@ Page Language="C#" AutoEventWireup="true" CodeFile="Javascript_Checkbox.aspx.cs" Inherits="Javascript_Checkbox" %>

<!DOCTYPE html PUBLIC "-//W3C//DTD XHTML 1.0 Transitional//EN" "http://www.w3.org/TR/xhtml1/DTD/xhtml1-transitional.dtd">

<html xmlns="http://www.w3.org/1999/xhtml" >
<head runat="server">
<title>Javascript Selectted Item From CheckBoxList</title>

<script type="text/javascript">
function Get_Selected_Value()
{
var ControlRef = document.getElementById('<%= CheckBoxList1.ClientID %>');
var CheckBoxListArray = ControlRef.getElementsByTagName('input');
var spanArray=ControlRef.getElementsByTagName('span');
var checkedValues = '';
var nIndex=0;
var sValue='';

for (var i=0; i<CheckBoxListArray.length; i++)
{
var checkBoxRef = CheckBoxListArray[i];

if ( checkBoxRef.checked == true )
{
var labelArray = checkBoxRef.parentNode.getElementsByTagName('label');


if ( labelArray.length > 0 )
{
if ( checkedValues.length > 0 )
{
checkedValues += ', ';
nIndex += ', ';
sValue += ', ';
}
checkedValues += labelArray[0].innerHTML;
nIndex +=i;
sValue +=spanArray[i].alt;
}
}
}
document.getElementById('<%= lbl_SelectedValue.ClientID %>').innerHTML='<b>Selected Value:</b> '+ sValue;
document.getElementById('<%= lbl_SelectedText.ClientID %>').innerHTML='<b>Selected Text:</b> '+checkedValues;
document.getElementById('<%= lbl_SelectedIndex.ClientID %>').innerHTML='<b>Selected Index:</b> '+nIndex;
}
</script>

</head>
<body>
<form id="form1" runat="server">
<div>
<asp:CheckBoxList ID="CheckBoxList1" runat="server" onclick="Get_Selected_Value();" OnDataBound="CheckBoxList1_DataBound">
</asp:CheckBoxList>
<hr />
<label id="lbl_SelectedValue" runat="server"></label><br />
<label id="lbl_SelectedText" runat="server"></label><br />
<label id="lbl_SelectedIndex" runat="server"></label>
</div>
</form>
</body>
</html>

Now in code behind write the serverside code like below:
using System;
using System.Data;
using System.Configuration;
using System.Web.UI.WebControls;
using System.Data.SqlClient;

public partial class Javascript_Checkbox : System.Web.UI.Page
{
protected void Page_Load(object sender, EventArgs e)
{
string connectionString = ConfigurationManager.ConnectionStrings["TestConnection"].ConnectionString;
DataTable dt = new DataTable();
SqlConnection conn = new SqlConnection(connectionString);
using (conn)
{
SqlDataAdapter ad = new SqlDataAdapter(
"SELECT ID,Title from Article", conn);
ad.Fill(dt);
}
CheckBoxList1.DataSource = dt;
CheckBoxList1.DataTextField = "Title";
CheckBoxList1.DataValueField = "ID";
CheckBoxList1.DataBind();
}

protected void CheckBoxList1_DataBound(object sender, EventArgs e)
{
CheckBoxList chkList = (CheckBoxList)(sender);
foreach (ListItem item in chkList.Items)
item.Attributes.Add("alt", item.Value);
}
}

Run the project & you will get an interface like below:


Hope now you can read Selected Value, Selected Text, Selected Index from Asp.net CheckBoxList server control. The SelectedValue may not work in Firefox/Opera. I didn't test yet.

Monday, December 7, 2009

How to detect page refresh using asp.net


Please visit my new Web Site https://coderstechzone.com


Most of the forum i found this problem. Thats why in this article i will try to explain how one can detect browser refresh button has been clicked by user. Why detection is necessary because let you have an entry page, when user click to save button then the data saved into the database. The problem is now if user click on browser refresh button then the same set of data again inserted into the database because Refresh button always perform user last action. Which is the problem as well as this is the solution. We will use this technique to resolve this issue.


An Alternative Solution:
Let you have an entry page named frmArticle. Then you can block multiple time insert operation regarding page refresh by just redirect to the same page just after your insertion. Since the refresh works on last event so that if user click on breowser refresh button the frmArticle page will just load again with empty textbox controls.


Now add a page into your project. And write the below MARKUP code:

<%@ Page Language="C#" AutoEventWireup="true" CodeFile="Detect_Page_Refresh.aspx.cs" Inherits="Detect_Page_Refresh" %>

<!DOCTYPE html PUBLIC "-//W3C//DTD XHTML 1.0 Transitional//EN" "http://www.w3.org/TR/xhtml1/DTD/xhtml1-transitional.dtd">

<html xmlns="http://www.w3.org/1999/xhtml" >
<head runat="server">
<title>How to Detect Page Refresh</title>
</head>

<body>
<form id="form1" runat="server">
<div>

<asp:Button runat="server" ID="btn" Text="Click Me" OnClick="btn_Click" />

</div>
</form>
</body>

</html>

Now in code behind write the below code:
using System;

public partial class Detect_Page_Refresh : System.Web.UI.Page
{

protected void Page_Load(object sender, EventArgs e)
{
if(!IsPostBack)
Session["Check_Page_Refresh"] = DateTime.Now.ToString();
}

protected void Page_PreRender(object sender, EventArgs e)
{
ViewState["Check_Page_Refresh"] = Session["Check_Page_Refresh"];
}

protected void btn_Click(object sender, EventArgs e)
{
if (ViewState["Check_Page_Refresh"].ToString() == Session["Check_Page_Refresh"].ToString())
{
Response.Write("Detect Postback or User Event fired....");
Session["Check_Page_Refresh"] = DateTime.Now.ToString();
}
else
Response.Write("Page Refresh Detected....");
}
}

Output:

Fig: Output

The main logic is we wiil use two variables. One is Session variable & another one ViewStatevariable. Initialy bothe variable contain same time so that when user click on button thenthe condition will be satisfied & execute code that we want. When user click on browser refresh button then the ViewState variable reset to the time of page_load event. So btn_click event condition will not satisfyand write "Page Refresh Detected....". If you cant understand yet then please read the belowexpalanation. Otherwise skip.

Code Explanation:
When you run the project then at first Page_Load evebt fired.Means now Session variable Check_Page_Refresh contains the current date time valuelike "12/7/2009 11:20:14 AM". After that Page_PreRender method will be executed means Viewstate variable Check_Page_Refresh assigned by Session state variable Check_Page_Refresh value. So at that moment both ViewState & Session variable is same.

Now page is open and user click on button. So the Page_Load event wiil be fired but Session variable will not set since the action is PostBack action. After that btn_Click event fired & will display "Detect Postback or User Event fired...." since both Sessionstate variable and ViewState variable are same. And also do not forget that here the Session state variable also reset. Let now the Session state variable holds value "12/7/2009 11:22:14 AM". Now the Page_PreRender event also executed after btn_Click event so that both Session variable and ViewState variable will be same means "12/7/2009 11:22:14 AM". So if user again click on the button same scenario wll be executed since both Session and ViewState variable is same & also both variable reset to the current time.

Ok now if user click on Refresh then what happend? This is the main portion that you have to understand to detect Page Refresh. Steps were: First Page_Load event fired but Session variable not set since the action is PostBack. After that btn_Click event fired. We knew that before click on Refresh button both variable were same but when user click on Refresh button then the ViewState variablere set to previous one before button click event. Means refresh button will perform from user last event. So now the ViewState variable is reset to "12/7/2009 11:20:14 AM" instead of "12/7/2009 11:22:14 AM" where as Session state variable is "12/7/2009 11:22:14 AM". So now you can detect easily that the user click on Refresh button. It will be better to debug the code in each event. So that you can easily understand the cases.

Tuesday, December 1, 2009

The syntax of SQL Server Cursor


Please visit my new Web Site https://coderstechzone.com


Cursor means memory address where SQL data processed. By using cursor one can process data one by one by looping through all records within a cursor. So when developer thinks that there is no way to accomplish an operation by writing a single query then the alternative solution is cursor. That means cursor ease our life by providing a looping mechanism through all records. But one thing keep in mind that SQL Server cursor performance is very bad than oracle cursor. So think twice when you want to write a cursor. In my next article i will show you how one can avoid cursor by using simple while loop statement. This is not the focus area of my current Article. Better I will discuss very basics on SQL Server Cursor. One thing is clear that when we need to process row one by one or if we cant built a logic by a single SQL statement then we will use SQL Server cursor. Steps to follow to write a cursor in SQL Server:

1. Declare cursor
2. Open cursor
3. Fetch row from the cursor
4. Process fetched row
5. Close cursor
6. Deallocate cursor


Before starting to write a real life example it will be better to discuss the syntax of SQL Server cursor.

Syntax:

DECLARE cursor_name CURSOR
[ LOCAL GLOBAL ]
[ FORWARD_ONLY SCROLL ]
[ STATIC KEYSET DYNAMIC FAST_FORWARD ]
[ READ_ONLY SCROLL_LOCKS OPTIMISTIC ]
[ TYPE_WARNING ]
FOR select_statement [ FOR UPDATE [ OF column_name [ ,...n ] ] ]

Description:
cursor_name is the name of the Transact-SQL server cursor defined. cursor_name must conform to the rules for identifiers.

LOCAL
specifies that the scope of the cursor is local to the batch, stored procedure, or trigger in which the cursor was created. The cursor name is only valid within this scope. The cursor can be referenced by local cursor variables in the batch, stored procedure, or trigger, or a stored procedure OUTPUT parameter. An OUTPUT parameter is used to pass the local cursor back to the calling batch, stored procedure, or trigger, which can assign the parameter to a cursor variable to reference the cursor after the stored procedure terminates. The cursor is implicitly deallocated when the batch, stored procedure, or trigger terminates, unless the cursor was passed back in an OUTPUT parameter. If it is passed back in an OUTPUT parameter, the cursor is deallocated when the last variable referencing it is deallocated or goes out of scope.

GLOBAL
specifies that the scope of the cursor is global to the connection. The cursor name can be referenced in any stored procedure or batch executed by the connection. The cursor is only implicitly deallocated at disconnect.

Note If neither GLOBAL or LOCAL is specified, the default is controlled by the setting of the default to local cursor database option. In SQL Server version 7.0, this option defaults to FALSE to match earlier versions of SQL Server, in which all cursors were global. The default of this option may change in future versions of SQL Server.

FORWARD_ONLY
specifies that the cursor can only be scrolled from the first to the last row. FETCH NEXT is the only supported fetch option. If FORWARD_ONLY is specified without the STATIC, KEYSET, or DYNAMIC keywords, the cursor operates as a DYNAMIC cursor. When neither FORWARD_ONLY nor SCROLL is specified, FORWARD_ONLY is the default, unless the keywords STATIC, KEYSET, or DYNAMIC are specified. STATIC, KEYSET, and DYNAMIC cursors default to SCROLL. Unlike database APIs such as ODBC and ADO, FORWARD_ONLY is supported with STATIC, KEYSET, and DYNAMIC Transact-SQL cursors. FAST_FORWARD and FORWARD_ONLY are mutually exclusive; if one is specified the other cannot be specified.

STATIC
defines a cursor that makes a temporary copy of the data to be used by the cursor. All requests to the cursor are answered from this temporary table in tempdb; therefore, modifications made to base tables are not reflected in the data returned by fetches made to this cursor, and this cursor does not allow modifications.

KEYSET
specifies that the membership and order of rows in the cursor are fixed when the cursor is opened. The set of keys that uniquely identify the rows is built into a table in tempdb known as the keyset. Changes to nonkey values in the base tables, either made by the cursor owner or committed by other users, are visible as the owner scrolls around the cursor. Inserts made by other users are not visible (inserts cannot be made through a Transact-SQL server cursor). If a row is deleted, an attempt to fetch the row returns an @@FETCH_STATUS of -2. Updates of key values from outside the cursor resemble a delete of the old row followed by an insert of the new row. The row with the new values is not visible, and attempts to fetch the row with the old values return an @@FETCH_STATUS of -2. The new values are visible if the update is done through the cursor by specifying the WHERE CURRENT OF clause.

DYNAMIC
defines a cursor that reflects all data changes made to the rows in its result set as you scroll around the cursor. The data values, order, and membership of the rows can change on each fetch. The ABSOLUTE fetch option is not supported with dynamic cursors.

FAST_FORWARD
specifies a FORWARD_ONLY, READ_ONLY cursor with performance optimizations enabled. FAST_FORWARD cannot be specified if SCROLL or FOR_UPDATE is also specified. FAST_FORWARD and FORWARD_ONLY are mutually exclusive; if one is specified the other cannot be specified.

READ_ONLY
prevents updates made through this cursor. The cursor cannot be referenced in a WHERE CURRENT OF clause in an UPDATE or DELETE statement. This option overrides the default capability of a cursor to be updated.

SCROLL_LOCKS
specifies that positioned updates or deletes made through the cursor are guaranteed to succeed. Microsoft® SQL Server™ locks the rows as they are read into the cursor to ensure their availability for later modifications. SCROLL_LOCKS cannot be specified if FAST_FORWARD is also specified.

OPTIMISTIC
specifies that positioned updates or deletes made through the cursor do not succeed if the row has been updated since it was read into the cursor. SQL Server does not lock rows as they are read into the cursor. It instead uses comparisons of timestamp column values, or a checksum value if the table has no timestamp column, to determine whether the row was modified after it was read into the cursor. If the row was modified, the attempted positioned update or delete fails. OPTIMISTIC cannot be specified if FAST_FORWARD is also specified.

TYPE_WARNING
specifies that a warning message is sent to the client if the cursor is implicitly converted from the requested type to another.

select_statement
is a standard SELECT statement that defines the result set of the cursor. The keywords COMPUTE, COMPUTE BY, FOR BROWSE, and INTO are not allowed within select_statement of a cursor declaration.

SQL Server implicitly converts the cursor to another type if clauses in select_statement conflict with the functionality of the requested cursor type.

FOR UPDATE
[OF column_name [,...n]] defines updatable columns within the cursor. If OF column_name [,...n] is supplied, only the columns listed allow modifications. If UPDATE is specified without a column list, all columns can be updated, unless the READ_ONLY concurrency option was specified.

EXAMPLE:
DECLARE @Slab1From INT
DECLARE @Slab2From INT
DECLARE @Slab3From INT
DECLARE Slab_cursor CURSOR FOR
SELECT CONVERT(INT,SUBSTRING(Slab1A_Time_From,1,2)),
CONVERT(INT,SUBSTRING(Slab2A_Time_From,1,2)),
CONVERT(INT,SUBSTRING(Slab3A_Time_From,1,2))
FROM tariff_table_test

OPEN Slab_cursor
FETCH NEXT FROM Slab_cursor INTO @Slab1From,@Slab2From,@Slab3From

WHILE @@FETCH_STATUS = 0
BEGIN
IF @Slab1From>@Slab2From
BEGIN
Print 'Slab1 is greater than Slab2'
-- Other logic here
END

IF @Slab1From>@Slab3From
BEGIN
Print 'Slab1 is greater than Slab3'
--Other logic here
END

FETCH NEXT FROM Slab_cursor INTO @Slab1From,@Slab2From,@Slab3From
END

CLOSE Slab_cursor
DEALLOCATE Slab_cursor

Indications:
Steps to write SQL Server that i have discussed at the beginning of this article is given below:


Code Explanation:
In the above example here i need to apply some business rules when slab1 is greater than slab2 or slab3. SUBSTRING is used since my data was in different format like 08:17:59. And i convert it into INT since I need to compare with Slab2 & Slab3. Here what i did actually doesn't a matter. The matter is how one can write SQL Server Cursor. And hope now you can write SQL Server cursor from simple to complex one.

Remarks:
If a DECLARE CURSOR using Transact-SQL syntax does not specify READ_ONLY, OPTIMISTIC, or SCROLL_LOCKS, the default is as follows:

If the SELECT statement does not support updates (insufficient permissions, accessing remote tables that do not support updates, and so on), the cursor is READ_ONLY.

STATIC and FAST_FORWARD cursors default to READ_ONLY.

DYNAMIC and KEYSET cursors default to OPTIMISTIC.

Permissions:
DECLARE CURSOR permissions default to any user that has SELECT permissions on the views, tables, and columns used in the cursor.

This is an Introduction on how to Write SQL Server Cursor. For better understanding you can read below links.

REF:
http://msdn.microsoft.com/en-us/library/ms180169.aspx
http://www.teratrax.com/articles/sql_server_cursor.html

Want To Search More?
Google Search on Internet
Subscribe RSS Subscribe RSS
Article Categories
  • Asp.net
  • Gridview
  • Javascript
  • AJAX
  • Sql server
  • XML
  • CSS
  • Free Web Site Templates
  • Free Desktop Wallpapers
  • TopOfBlogs
     
    Free ASP.NET articles,C#.NET,VB.NET tutorials and Examples,Ajax,SQL Server,Javascript,Jquery,XML,GridView Articles and code examples -- by Shawpnendu Bikash